Look, Salted Caramel Swirl Brownies sound fancy, but here’s the truth: they’re basically regular brownies with a caramel upgrade that takes maybe ten extra minutes. The brownie part? Classic fudgy texture, crackly top, intense chocolate flavor. The caramel? Homemade, yes, but the kind where you just watch sugar melt in a pan—no thermometer clipped to the side, no stress about hitting exact temperatures. This recipe came about after too many batches of dry brownies from boxes and too many jars of store-bought caramel that tasted more like corn syrup than actual butter and cream.
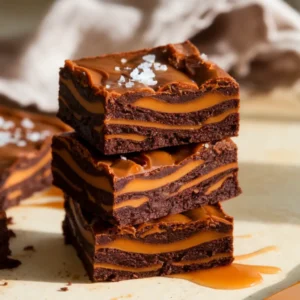
What you end up with here is the kind of brownie that makes people ask if you picked them up from that expensive bakery downtown. They’re perfect for bringing to gatherings when you want something more interesting than plain chocolate but don’t want to spend your entire Saturday decorating cupcakes. The caramel adds this buttery, slightly salty contrast that keeps the chocolate from being one-note, and that marble pattern on top? Happens almost by accident once you know the simple swirling trick.
*Before You Start: You’ll find more explanation here than a basic recipe. That’s intentional—the aim is to educate, not just instruct.
Here’s Why These Brownies Deserve a Spot in Your Kitchen
❃ The caramel is actually doable: Just sugar in a pan, some cream, butter, salt. No special equipment or candy-making experience required
❃ One bowl for the brownies: Melt chocolate, add stuff, stir. That’s genuinely it for the brownie base
❃ They get better overnight: Make them Saturday, serve Sunday. The flavors deepen and the texture gets even fudgier
❃ Looks way harder than it is: That professional marble pattern takes about ninety seconds with a butter knife
❃ Freezes beautifully: Wrap individually and stash in the freezer for whenever you need a serious dessert fast
❃ Adjustable salt level: Start with less, add more on top if you want. Everyone’s got different preferences
What You’ll Need (and Why Each One Matters)
For the Brownie Base:
• ¾ cup (170g) unsalted butter, plus a bit extra for the pan
• 8 ounces (225g) dark chocolate (something between 60–70% cacao), chopped into chunks — Bar chocolate melts way smoother than chips, which have stabilizers to keep their shape
• 1¼ cups (250g) granulated sugar
• 3 large eggs, sitting out for 30 minutes so they’re room temp — Cold eggs straight from the fridge can make melted chocolate seize up into a grainy mess
• 1 teaspoon vanilla extract — Real vanilla, not imitation if you can help it
• ¾ cup (95g) all-purpose flour
• ¼ cup (25g) Dutch-process cocoa powder — Regular cocoa works too, but Dutch-process gives you that really dark, almost black color
• ½ teaspoon fine sea salt

For the Salted Caramel Swirl:
• ¾ cup (150g) granulated sugar
• ¼ cup (60ml) heavy cream, also at room temperature — Seriously, cold cream hitting hot caramel = angry bubbling and potential seizing
• 3 tablespoons (45g) unsalted butter, cut into a few pieces
• ½ teaspoon flaky sea salt, plus extra for sprinkling — Maldon is perfect here, but any flaky salt works
Quick Note: These keep at room temperature in something airtight for about four days. Fridge extends that to a week, but they firm up when cold—just let them sit out for twenty minutes before eating.
Let’s Get Baking — The Brownie Breakdown
1 Get your pan ready and turn on the oven.
Line a 9×9-inch pan with parchment paper—let it hang over two opposite sides so you can lift the whole brownie slab out later. Rub a little butter on the parchment because even nonstick parchment sometimes sticks. Heat your oven to 350°F and move a rack to the middle position.
2 Start with the caramel because it needs cooling time.
Spread ¾ cup sugar evenly across the bottom of a heavy saucepan—something like a small Dutch oven or thick-bottomed pot. Put it over medium heat and just watch it. Don’t stir yet. The edges will start melting first, getting liquidy and clear. Once you see that happening, start gently swirling the pan—not stirring with a spoon, just tilting it in circles. Keep doing this until everything melts into an amber liquid that looks like the color of a penny. Takes about 6–8 minutes total, and yes, you need to stay right there watching it.

3 Finish the caramel without burning yourself.
Pull the pan off the heat and pour in that room-temp cream. It’s going to bubble up aggressively and steam everywhere—this is normal, just don’t put your face over it. Whisk until it calms down and looks smooth, then add those butter pieces and the ½ teaspoon flaky salt. Keep whisking until the butter disappears completely. Pour the whole thing into a bowl and leave it alone while you make the brownie batter. It’ll thicken up as it cools.
4 Melt the chocolate and butter together.
Toss your chopped chocolate and ¾ cup butter in a microwave-safe bowl. Microwave for 30 seconds, stir, then keep going in 30-second bursts, stirring between each one, until everything’s melted and smooth. Usually takes about 90 seconds total. Or use a double boiler if you’re fancy. Either way, let it cool for five minutes after—if it’s too hot when you add the eggs, you’ll end up with scrambled eggs in chocolate, which is not the texture we’re going for.
5 Mix up the brownie batter.
Whisk that 1¼ cups sugar into your cooled chocolate mixture. Add the eggs one at a time, whisking well after each one until the batter looks shiny and a bit thicker. Stir in the vanilla. Now sift your flour, cocoa powder, and salt right over the bowl—or just whisk them together first if you don’t have a sifter—and fold everything together gently with a spatula. Stop as soon as you don’t see dry flour anymore. Overmixing makes brownies cakey instead of fudgy, and nobody wants that.

6 Do the swirling thing.
Pour your brownie batter into the prepared pan and smooth the top with a spatula. Drizzle your cooled caramel over the surface in lines going one direction—doesn’t need to be perfect. Take a butter knife or a skewer and drag lines perpendicular to the caramel, going through it to create that marble pattern. Maybe six or eight drags total. Stop before you think you should—too much swirling and everything just turns muddy brown instead of having distinct ribbons.

7 Bake until they’re just barely done.
Stick the pan in the oven for 28–32 minutes. You’re looking for edges that are set and pulling away slightly from the pan, but a center that still jiggles a tiny bit when you shake the pan. Poke a toothpick about two inches in from the edge—you want moist crumbs, not wet batter, but definitely not clean. The center will look underdone, and that’s correct. They keep cooking as they cool, and pulling them early is what keeps them fudgy instead of turning into chocolate cake.
8 Practice patience with the cooling.
Leave them in the pan for at least two hours at room temperature. Or cheat and put them in the fridge for an hour if you’re in a hurry. Use those parchment handles to lift the whole block out, then cut into 16 squares with a big knife that you wipe clean between each cut. Sprinkle some extra flaky salt on top right before serving if you want that really pretty finish.

Tiny Details That Make a Big Difference
❃ The sugar-melting thing freaks people out, but watch the color, not the clock. Once you see that amber-penny color, you’re done. Go darker and it tastes burnt. Pull it earlier and it’s too sweet without that caramel depth.
❃ Spoon your flour into the measuring cup instead of scooping. Scooping packs it down and you end up with too much, which dries out the brownies. Spoon it in lightly, then level off the top.
❃ Room temperature ingredients aren’t just a suggestion here. Cold eggs or cream really will mess with the texture—the eggs can make the chocolate grainy, and the cream can make the caramel crystallize instead of staying smooth.
❃ Better chocolate = better brownies. You’re not adding a ton of other flavors to hide behind, so whatever chocolate you use is going to be front and center. Grab something you’d actually want to eat on its own.
❃ The next-day thing is real. Fresh from the oven they’re good, but something happens overnight where the flavors meld and the whole thing gets fudgier. Make them ahead if you can.

Nutritional Snapshot
Per serving (1 brownie, based on 16 servings):
• Calories: 285
• Carbohydrates: 34g
• Protein: 3g
• Fat: 16g
• Fiber: 2g
• Sugar: 28g
• Sodium: 145mg
❃ Nutrition info is estimated and may vary based on specific ingredients used.
Things You’ll Probably Wonder While Baking These
➲ What if someone can’t have dairy?
You can swap in coconut oil for the butter (use the solid kind, not liquid) and coconut cream for the heavy cream. Use dairy-free chocolate. They’ll taste a little different—coconut has its own flavor—but still really good.
➲ My caramel got too hard to drizzle. Now what?
Just pop it in the microwave for 10–15 seconds and stir. Repeat if you need to. You want it thick but pourable, like it drips slowly off a spoon.
➲ They stuck to the pan even with parchment. Why?
The corners are usually the culprit. Next time really press that parchment into the corners and give it a good butter coating. Also, cooling completely helps—trying to cut them warm makes everything stick.
➲ Can this work in a bigger pan?
Absolutely. Double everything and use a 9×13 pan instead. Baking time goes up to 32–36 minutes. Same doneness test applies—jiggly center, moist crumbs on the toothpick.
Final Thoughts Before You Grab the Spatula
What makes these brownies worth the little bit of extra effort is how they manage to taste both comforting and kind of special at the same time. The chocolate part is everything a brownie should be—dense, fudgy, intensely chocolatey. Then you hit those pockets of caramel that are buttery and a little salty, and it just works. The whole thing feels more interesting than regular brownies without getting into complicated territory.
Once you’ve made the caramel one time, you’ll realize it’s more about paying attention than having skills. Same with the swirling—it looks impressive but takes about a minute. These are the kind of brownies that make people happy when you show up with them, and that’s really the point of baking anyway.
If you’re into this, you might also like my:
❃ Fudgy Cheesecake Swirl Brownies (The Easy Recipe You Need Now)
❃ Fudgy Gluten Free Zucchini Brownies in 35 Minutes
❃ Rich & Fudgy Chocolate Brownie with Cocoa Powder (30 Minutes!)
❃ Best Fudgy Brownies Recipe – Rich & Dense (Only 5-Ingredient!)
Drop a comment if you try these—especially if you play around with different salts or mix-ins. Some people even swirl in peanut butter (sounds chaotic, but it totally works!). And if you want to come back to this recipe later, save it to Pinterest so you can find it again when the craving hits.
The Best Salted Caramel Swirl Brownies (One Bowl Recipe)
Ingredients
Brownie Base:
- ¾ cup unsalted butter
- 8 ounces dark chocolate chopped
- 1¼ cups granulated sugar
- 3 large eggs room temperature
- 1 teaspoon vanilla extract
- ¾ cup all-purpose flour
- ¼ cup Dutch-process cocoa powder
- ½ teaspoon fine sea salt
Salted Caramel:
- ¾ cup granulated sugar
- ¼ cup heavy cream room temperature
- 3 tablespoons unsalted butter
- ½ teaspoon flaky sea salt
- Extra flaky sea salt for topping
Instructions
- Preheat oven to 350°F. Line a 9×9-inch pan with parchment paper, leaving overhang on two sides.
- For caramel: Heat ¾ cup sugar in a heavy saucepan over medium heat without stirring. Once edges melt, swirl pan gently until all sugar becomes amber colored, 6-8 minutes. Remove from heat, whisk in cream (it will bubble), then add butter and salt. Pour into a bowl to cool.
- Melt chocolate and ¾ cup butter in microwave in 30-second intervals, stirring between, until smooth. Cool 5 minutes.
- Whisk 1¼ cups sugar into chocolate. Add eggs one at a time, whisking well. Stir in vanilla. Fold in flour, cocoa, and salt until just combined.
- Pour batter into pan. Drizzle cooled caramel in lines, then drag a knife perpendicular through to create swirls.
- Bake 28-32 minutes until edges are set but center jiggles slightly. Cool completely, about 2 hours, before cutting into 16 squares. Sprinkle with extra flaky salt.