Let’s be honest, when you serve this red velvet Oreo cheesecake at your next gathering, everyone’s going to assume you either went to pastry school or spent way too much money at a fancy bakery. But here’s the beautiful secret: this stunner is totally doable in your own kitchen, and you don’t need any special skills to pull it off.
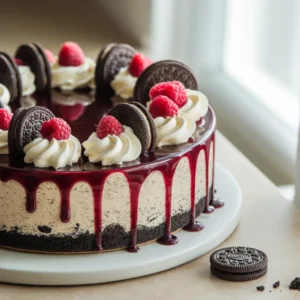
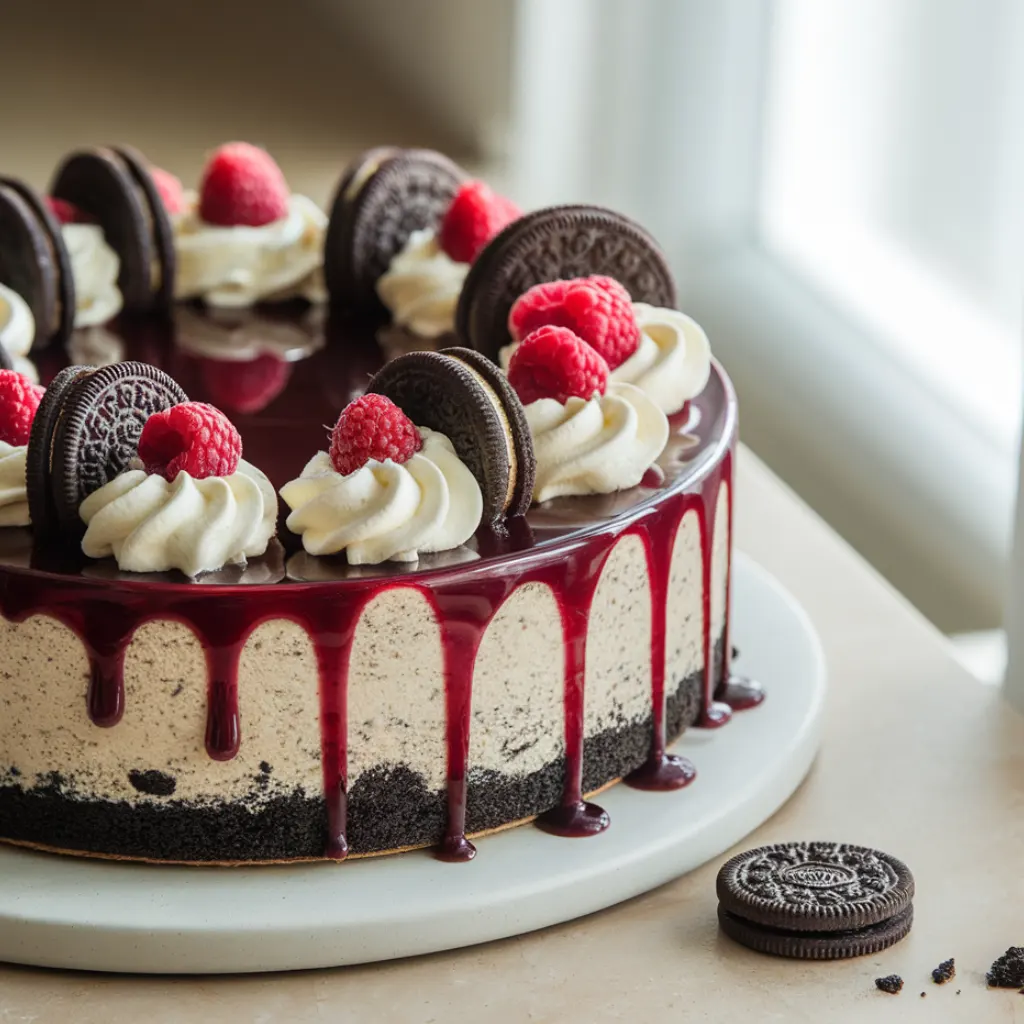
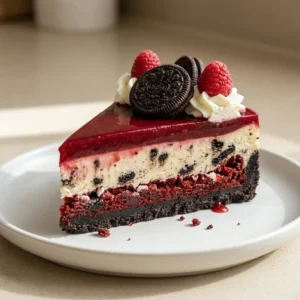
What makes this dessert so special is how it layers flavors and textures that just work together. You’ve got that dark, chocolatey Oreo crust giving you the perfect crunch, then a dreamy cream cheese layer studded with more Oreo pieces (because why not?), topped with red velvet cake crumbs, and finished with a glossy mirror glaze that catches the light like something out of a magazine spread.
The best part? You can break this recipe down into totally manageable steps over a couple of days. No need to stress yourself out trying to do everything at once. Whether you’re planning a birthday bash, anniversary dinner or just want to treat yourself because it’s Tuesday, this cheesecake delivers the wow factor without the drama. And honestly, watching people’s faces when you bring this out makes every single step worth it.
*Before You Start: You’ll find more explanation here than a basic recipe. That’s intentional, the aim is to educate, not just instruct.
The Kind of Dessert People Remember
❃ Seriously impressive without the stress: Everything can be prepped ahead, so you’re not scrambling last-minute before guests arrive
❃ Flexibility built right in: Skip the mirror glaze if you’re short on time, it’s still gorgeous with simple whipped cream
❃ Tastes even better than it looks: This isn’t just a pretty face, every layer brings something delicious to the table
❃ Feeds a crowd: One cheesecake gives you 12-14 generous slices, perfect for parties or family gatherings
❃ Freezer-friendly for life-saving moments: Make it weeks ahead and pull it out when you need something special (future you will be so grateful)
❃ Budget-friendly indulgence: Costs about $18 to make what would run you $70+ at a specialty bakery
Everything That Goes Into This Beauty
For the Oreo Crust:
• 24 Oreo cookies (keep the filling in, trust me on this!)
• 5 tablespoons unsalted butter, melted
• Tiny pinch of salt
Quick tip: If you don’t have a food processor, no worries! Just toss those Oreos in a sealed bag and go to town with a rolling pin. It’s actually pretty therapeutic.
For the Cheesecake Layer:
• 24 oz cream cheese (that’s three 8-oz blocks), softened to room temp
• 3/4 cup granulated sugar
• 3 large eggs, also at room temperature
• 1/2 cup sour cream (room temp, are you sensing a theme here?)
• 1 tablespoon vanilla extract
• 1 cup crushed Oreos (roughly 10 cookies), chopped into chunks
Heads up: Room temperature ingredients are your secret weapon for silky-smooth cheesecake. Cold ingredients equal lumpy batter, and nobody wants that. Just set everything out an hour or two before you start baking.

For the Red Velvet Layer:
• 1 1/2 cups red velvet cake crumbs (homemade or store-bought, no judgment!)
• 3 tablespoons cream cheese, softened
• 2 tablespoons powdered sugar
Life hack: Grab a small red velvet cake from your grocery store bakery. Use what you need for this recipe, and “accidentally” eat the rest with your coffee. Or freeze it for round two!
For the Mirror Glaze:
• 1 1/2 cups granulated sugar
• 3/4 cup water
• 1 cup sweetened condensed milk
• 2 1/2 teaspoons powdered gelatin (one envelope)
• 1/4 cup cold water (for the gelatin)
• 1 1/2 cups white chocolate chips
• Red gel food coloring (start small, add more as needed)
The real talk on mirror glaze: Yes, you need to check the temperature. But don’t let that scare you off! A simple instant-read thermometer from the grocery store works perfectly. This is the one step that makes the biggest visual difference, so it’s worth the extra attention.
For the Pretty Stuff:
• Whipped cream or cream cheese frosting
• Whole Oreos for decorating
• Fresh raspberries or strawberries if you’re feeling fancy
How This Cheesecake Comes Together
1 Make that crust
Preheat your oven to 325°F. Toss those Oreos (filling and all!) into a food processor and pulse until you’ve got fine crumbs, about 30-40 pulses should do it. Mix in the melted butter and a pinch of salt until everything looks like wet sand. Press this mixture firmly into the bottom of your 9-inch springform pan. Use the bottom of a measuring cup to really pack it down and get it nice and even. Pop it in the oven for 10 minutes, then let it cool completely. This little pre-bake makes all the difference in preventing a soggy bottom!
2 Whip up the cheesecake filling
Here’s where patience pays off. Beat your room-temp cream cheese with an electric mixer on medium speed for about 2-3 minutes until it’s completely smooth and fluffy. Scrape down the sides of the bowl, those hidden lumps love to hide up there! Add the sugar and beat for another 2 minutes. Now add those eggs one at a time, mixing on low speed just until each one disappears into the batter. Here’s the thing: overmixing at this stage adds air bubbles that can crack your cheesecake, so gentle is the name of the game. Stir in the sour cream and vanilla on low for just 10-15 seconds, then fold in your crushed Oreos by hand with a spatula.

3 The magical water bath bake
Pour your filling over that cooled crust. Give the pan a few gentle taps on the counter to release any sneaky air bubbles. Now, wrap the outside of your springform pan in two layers of aluminum foil (this keeps water from seeping in), then place it in a larger roasting pan. Pour hot water into the roasting pan until it comes about halfway up the sides of your springform. This water bath is your insurance policy against cracks, the steam keeps everything cooking gently and evenly.
Bake for 55-65 minutes. You’re looking for set edges with a slightly jiggly center (about the size of a quarter). Turn off the oven, crack the door open, and let your cheesecake hang out in there for an hour. This slow cooldown is crack-prevention magic!
4 Chill and add the red velvet layer
Remove your cheesecake from the water bath (carefully, it’s still hot!) and refrigerate for at least 6 hours, but overnight is even better. Once it’s completely cold and set, mix together your red velvet cake crumbs, cream cheese, and powdered sugar until you’ve got a moldable paste. Press this evenly over the top of your chilled cheesecake, smoothing it out as much as possible. Back in the fridge it goes while you tackle the glaze!
5 Create that gorgeous mirror glaze
Sprinkle your gelatin over 1/4 cup cold water in a small bowl and let it sit for 5 minutes, it’ll get all spongy and weird-looking, which is exactly what you want. Meanwhile, combine the sugar and 3/4 cup water in a saucepan over medium heat, stirring until the sugar dissolves completely. Bring it to a boil, then remove from heat and stir in the condensed milk and that bloomed gelatin. Stir until everything’s dissolved and smooth. Put your white chocolate chips in a heat-safe bowl and pour that hot mixture right over them.
Let it sit for 30 seconds (give those chips time to melt), then whisk until it’s silky smooth. Add your red food coloring a little at a time until you get that gorgeous deep red you’re after.
6 The temperature game (this is important!)
Let your glaze cool to 90-95°F, stirring it occasionally. This usually takes about 15-25 minutes, depending on how warm your kitchen is. Use an instant-read thermometer to check, this temperature is the sweet spot for that perfect glossy finish. Too hot and it’ll just run right off; too cool and you’ll get streaks. When it’s ready, place your chilled cheesecake (still in the springform pan) on a wire rack set over a baking sheet to catch the drips.
Pour the glaze slowly over the center and watch it flow to the edges like magic. You can use an offset spatula to gently guide it if needed, but try not to overwork it. Let it set at room temperature for about 10 minutes, then refrigerate for at least 2 hours.

7 The grand finale
When you’re ready to serve, run a knife dipped in hot water around the edge of the pan before releasing the springform. Pipe whipped cream rosettes around the edge (or just dollop it on, no pressure!), tuck in some Oreo cookies, add fresh berries if you’ve got them, and prepare for the compliments. For the prettiest slices, dip your knife in hot water and wipe it clean between each cut.
Stuff I Wish I Knew the First Time
❃ Room temperature isn’t just a suggestion: Cold cream cheese = lumpy batter, and no amount of mixing will fix it. Set everything out 1-2 hours before you start, and you’ll thank yourself later.
❃ The water bath is your best friend: Sure, it seems fussy, but wrapping that springform pan in foil and giving it a water bath is what keeps your cheesecake crack-free and creamy. It’s worth the extra two minutes of effort.
❃ Don’t stress about the glaze temperature: Get yourself a cheap instant-read thermometer (like, $10) and check before pouring. If it cools down too much while you’re getting ready, just pop it back in the microwave for 5-second bursts until it’s back in the zone.
❃ Freeze for Instagram-worthy slices: Want those perfect, pristine cuts with all the layers showing? Freeze the assembled cheesecake for 30 minutes before slicing. It cuts like a dream and thaws to perfect texture in about 15 minutes on the plate.
❃ Save that extra glaze: Any leftover glaze can be poured into silicone molds or onto parchment paper. Let it set, and you’ve got fancy little candies. They keep in the fridge for two weeks and make great last-minute gifts!

Nutrition Information (per serving, 12 slices)
• Calories: 485
• Total Fat: 28g
• Saturated Fat: 16g
• Carbohydrates: 52g
• Fiber: 1g
• Sugar: 42g
• Protein: 7g
• Sodium: 285mg
❃ Just a heads up, nutrition info is estimated and can vary based on brands and exact measurements. But let’s be real, this is a special occasion dessert, not Tuesday’s lunch!
Let’s Clear a Few Things Up
➲ Do I really need to make the mirror glaze, or can I skip it?
Honestly? The cheesecake is delicious with or without the glaze! If you’re short on time or feeling a bit intimidated, just top that red velvet layer with cream cheese frosting or freshly whipped cream. It’ll still look gorgeous and taste amazing. The mirror glaze is mostly for that jaw-dropping visual effect, so save it for when you want to really show off.
➲ How far ahead can I make this?
The cheesecake base is super make-ahead friendly, bake it up to 3 days before you need it and keep it refrigerated. Once you add the red velvet layer and glaze, this red velvet Oreo cheesecake stays perfect in the fridge for 4-5 days. Want to plan even further ahead? Freeze the whole thing before glazing, then thaw it overnight in the fridge and add the glaze the day you’re serving.
➲ Help! My mirror glaze looks streaky. What went wrong?
This usually means the glaze cooled down below 88°F before you poured it. The fix? Gently reheat it in 5-second microwave bursts, stirring between each one, until it’s back to 90-92°F. If you’ve already poured it and it’s set with streaks, don’t sweat it! Just embrace the artistic look or cover any imperfect spots with extra decorations. Honestly, it’ll still taste incredible.
➲ Can I make mini versions instead of one big cake?
Absolutely! Individual 4-inch springform pans or even mason jars work beautifully for layered parfait-style servings. Just adjust your baking time to about 25-30 minutes for the smaller cakes, and you’ll need less glaze per portion. These are actually easier to serve at parties, and everyone loves having their own little personal cheesecake!
Final Thoughts Before You Bake
Here’s the thing about this red velvet Oreo cheesecake, it looks like something you’d order at a fancy restaurant, but it’s totally achievable in your own kitchen. Yes, there are a few steps involved, but none of them are particularly difficult. And when you bring this beauty out and watch everyone’s reaction? That’s the moment you’ll realize it was absolutely worth it.
The combination of familiar, comforting flavors, Oreos, cream cheese, red velvet—presented in such an elegant way makes this perfect for everything from birthday celebrations to holiday dinners to “just because I felt like baking something fabulous” Saturdays.
If you loved this recipe, you might also want to check out my:
❃ Fudgy Red Velvet Brownies (So Easy, You’ll Make Them Weekly!)
❃ Vegan Raspberry Coconut Fudge (5 Ingredients, No-Bake!)
❃ Easy Red Velvet Cinnamon Rolls in Under 3 Hours (So Worth It!)
Now it’s your turn! Have you made this yet? I’d love to hear how it turned out, leave a comment below and let me know how it went or if you had any questions along the way. And if you’re feeling that little “I should totally make this” spark, go ahead and save it to your Pinterest board so it’s ready when you need it. Your future self will be so glad this recipe is waiting for that next impressive dessert moment!
Happy baking, gorgeous! You’ve got this! 💕
Red Velvet Oreo Cheesecake Recipe + Mirror Glaze Tips
Ingredients
Oreo Crust:
- 24 Oreo cookies with filling
- 5 tablespoons unsalted butter melted
- Pinch of salt
Cheesecake Layer:
- 24 oz cream cheese room temperature
- 3/4 cup granulated sugar
- 3 large eggs room temperature
- 1/2 cup sour cream room temperature
- 1 tablespoon vanilla extract
- 1 cup crushed Oreos about 10 cookies
Red Velvet Layer:
- 1 1/2 cups red velvet cake crumbs
- 3 tablespoons cream cheese softened
- 2 tablespoons powdered sugar
Mirror Glaze:
- 1 1/2 cups granulated sugar
- 3/4 cup water
- 1 cup sweetened condensed milk
- 2 1/2 teaspoons powdered gelatin
- 1/4 cup cold water for gelatin
- 1 1/2 cups white chocolate chips
- Red gel food coloring
Decoration:
- Whipped cream or cream cheese frosting
- Whole Oreos
- Fresh raspberries or strawberries optional
Instructions
- Preheat oven to 325°F. Process Oreos until fine crumbs form. Mix with melted butter and salt. Press firmly into bottom of 9-inch springform pan. Bake 10 minutes, then cool completely.
- Beat cream cheese 2-3 minutes until smooth. Add sugar, beat 2 minutes. Add eggs one at a time on low speed. Mix in sour cream and vanilla briefly. Fold in crushed Oreos.
- Pour filling over crust. Tap pan to release bubbles. Wrap pan in foil, place in roasting pan. Add hot water halfway up sides. Bake 55-65 minutes until edges set but center jiggles. Turn off oven, crack door, cool 1 hour inside.
- Refrigerate cheesecake 6+ hours. Mix red velvet crumbs with cream cheese and powdered sugar. Press evenly over chilled cheesecake. Refrigerate while making glaze.
- Bloom gelatin in 1/4 cup cold water for 5 minutes. Heat sugar and 3/4 cup water until dissolved, bring to boil. Remove from heat, stir in condensed milk and gelatin. Pour over white chocolate chips, let sit 30 seconds, whisk smooth. Add red coloring.
- Cool glaze to 90-95°F, stirring occasionally (15-25 minutes). Place cheesecake on rack over baking sheet. Pour glaze over center, let flow to edges. Set 10 minutes, refrigerate 2 hours.
- Run hot knife around pan edge before releasing. Decorate with whipped cream, Oreos, and berries. Dip knife in hot water between slices for clean cuts.