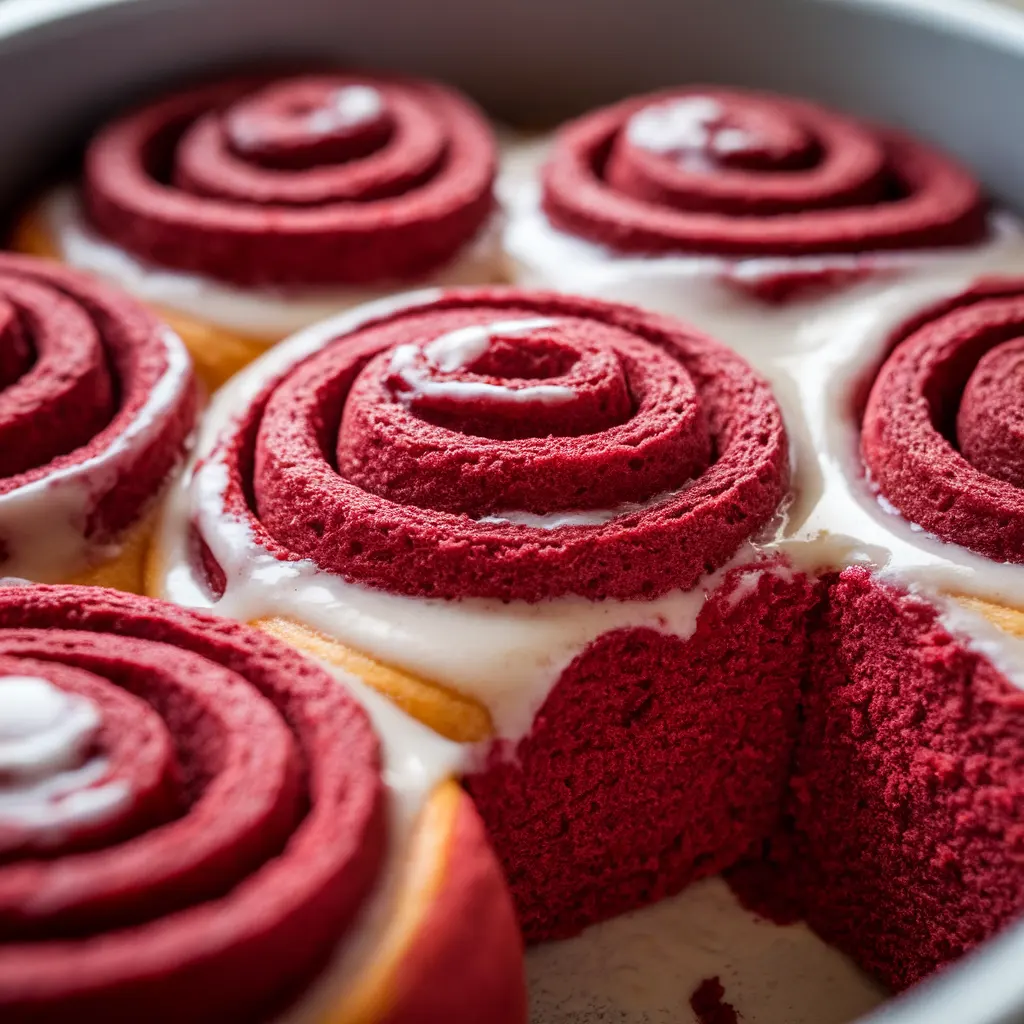
There’s something absolutely magical about red velvet cinnamon rolls fresh from the oven, the way they fill your kitchen with cinnamon-spiced warmth, how that first pull reveals tender, crimson layers, and that moment when the cream cheese frosting melts into every swirl. This recipe combines everything we love about weekend baking: it’s special enough to feel like an occasion but straightforward enough that you won’t need the whole day (or a culinary degree) to pull it off.
Whether you’re planning a cozy Valentine’s Day breakfast in bed, hosting a holiday brunch, or simply want to treat yourself to something beautiful on a Saturday morning, these rolls deliver. The dough is surprisingly forgiving, the cocoa adds just enough richness without tasting like chocolate cake, and that tangy cream cheese frosting? It’s the kind that makes you close your eyes and savor every bite. You’ll end up with 12 gorgeous rolls that stay soft for days, though in my experience, they rarely last past Sunday afternoon.
*Before You Start: You’ll find more explanation here than a basic recipe. That’s intentional, the aim is to educate, not just instruct.
If You Need a Reason to Make These… Here Are a Few
❃ Ready in under 3 hours: no overnight waiting, no planning ahead until you’re already craving them
❃ That bakery-style softness: light, pillowy layers that pull apart beautifully
❃ Stunning without the stress: the deep red color looks impressive, but the technique is totally beginner-friendly
❃ Cream cheese frosting that’s not too sweet: tangy enough to balance all that cinnamon-sugar goodness
❃ Freezer-friendly for busy mornings: bake a batch, freeze half, and you’ve got instant celebration breakfasts ready to go
❃ Makes your house smell incredible: honestly, this might be reason enough
Let’s Get Your Counter Loaded with the Good Stuff
For the Dough:
• 4 cups all-purpose flour, plus extra for dusting (bread flour works beautifully too if you want a slightly chewier texture)
• ¼ cup granulated sugar
• 1 packet (2¼ tsp) instant yeast. this is the no-fuss kind that goes straight into your flour; if you’ve only got active dry, just add 5 minutes to the rise time
• 1 tsp salt
• 2 tbsp unsweetened cocoa powder. stick with natural cocoa here, not Dutch-process, for the best rise
• 1 cup whole milk, warmed to about 110°F. it should feel like a warm bath on your wrist
• ¼ cup unsalted butter, melted and slightly cooled
• 2 large eggs, at room temperature. this really does matter for how the dough comes together
• 2 tbsp red gel food coloring. the gel kind is key here; liquid won’t give you that gorgeous deep color (find it in any baking aisle or craft store)

For the Filling:
• ½ cup unsalted butter, softened to the point where you can easily spread it
• ¾ cup light brown sugar, packed
• 2 tbsp ground cinnamon
• 1 tbsp unsweetened cocoa powder. this deepens that red velvet flavor
For the Cream Cheese Frosting:
• 8 oz cream cheese, softened (seriously, let it sit out for an hour, cold cream cheese = lumpy frosting)
• ¼ cup unsalted butter, also softened
• 2 cups powdered sugar, sifted if it’s clumpy
• 1 tsp vanilla extract
• Pinch of salt. trust me, it makes everything taste better
A note on the food coloring: If you’re not into artificial colors, these still taste absolutely incredible without it, they’ll just look more like chocolate cinnamon rolls. You can also try beet powder (start with 2 tablespoons), though the color will be softer and more burgundy than bright red.
Time to Bring the Dough to Life Step-by-Step
1 Get your dough started.
In your stand mixer bowl (or a large mixing bowl if you’re going the hand-mixing route), whisk together the flour, sugar, instant yeast, salt, and cocoa powder. You want that yeast distributed evenly so you don’t end up with random super-puffy spots. Pour in the warm milk, melted butter, eggs, and food coloring.
Mix on low with the dough hook until everything comes together into a shaggy dough, then bump it up to medium speed. Let it knead for 6–8 minutes until the dough is smooth and elastic, it should be slightly tacky but not sticky enough to really cling to your fingers. If it’s too wet, add flour a tablespoon at a time. Kneading by hand? Plan for about 10–12 minutes of good arm workout.

2 Let it rise and do its thing.
Shape your dough into a nice round ball and pop it into a greased bowl, turning it once so the whole surface gets a little oil love. Cover with a damp kitchen towel or plastic wrap and set it somewhere warm for 60–75 minutes. You’re looking for it to double in size, when you gently poke it with your finger, the indent should spring back slowly. My favorite trick? Turn on your oven light and let the bowl hang out in there. Perfect temperature every time.

3 Mix up that filling.
While your dough is rising, combine the softened butter, brown sugar, cinnamon, and cocoa powder in a small bowl. Mix until you have a thick, spreadable paste. Leave it at room temperature so it’s easy to spread later without tearing your beautiful dough.
4 Roll it out.
Once your dough has doubled, give it a good punch to release those air bubbles (oddly satisfying, right?). Turn it out onto a lightly floured counter and roll it into a 16×12-inch rectangle, about ¼ inch thick. If the dough keeps shrinking back on you, just let it rest for 5 minutes, the gluten needs a moment to relax.
5 Fill and roll.
Spread your cinnamon-cocoa filling all over the dough, leaving about a ½-inch border along one long edge. Starting from the opposite long side, roll the dough into a tight log, keeping the tension even as you go. Pinch that seam closed when you’re done. Here’s my favorite trick for cutting: use unflavored dental floss or fishing line instead of a knife. Just slide it under the log, cross the ends over the top, and pull, perfect slices with no squishing. Cut into 12 equal pieces.
6 Second rise.
Arrange your rolls cut-side up in a greased 9×13-inch pan, leaving about ½ inch between them. Cover again and let them rise for another 30–40 minutes until they’re puffy and touching each other. This second rise is what gives you those incredibly soft, fluffy rolls.
7 Bake them to perfection.
Preheat your oven to 350°F. Slide the pan in and bake for 22–26 minutes. You’re looking for the tops to be set and the edges just lightly golden, the centers should still look a bit moist. Check at 22 minutes because overbaking is the number one way to end up with dry cinnamon rolls, and nobody wants that. Let them cool for about 10 minutes before frosting.
8 Frosting time.
Beat the softened cream cheese and butter together with a hand mixer until it’s fluffy and light, about 2 minutes. Add the powdered sugar, vanilla, and that pinch of salt, then beat until smooth and spreadable. Slather it generously over your warm (not hot) rolls. Serve immediately, or cover and keep at room temperature for up to 2 days.
Tiny Details That Make a Big Difference
❃ Weigh your flour if you can. 480g for 4 cups. It’s the single best way to avoid dense rolls since scooping flour from the bag packs in way more than you think.
❃ Temperature matters more than you’d expect. if your kitchen is chilly, those rise times might need an extra 15–20 minutes. Don’t rush it; yeast needs warmth to work its magic.
❃ Make-ahead magic. after the second rise, cover the pan tightly and freeze for up to 2 months. The night before you want them, move the pan to the fridge to thaw, then bake as directed. Your future self will thank you.
❃ Want more chocolate flavor? add an extra tablespoon of cocoa to both the dough and the filling. It won’t overpower the cinnamon but will give you that deeper red velvet taste.
❃ Reheating without drying out. microwave individual rolls for 20–30 seconds, or warm the whole pan covered with foil at 300°F for about 10 minutes.
Quick Nutrition Breakdown Of These Red Velvet Cinnamon Rolls
• Servings: 12 rolls
• Calories: 420
• Carbs: 58g
• Protein: 7g
• Fat: 18g
• Fiber: 2g
• Sugar: 28g
• Sodium: 240mg
❃ Nutrition info is estimated and may vary based on specific ingredients and portion sizes.
Got Questions? I’ve Got You Covered
➲ What if I don’t have a stand mixer?
No problem at all. Mix everything in a large bowl with a wooden spoon until it comes together, then turn it out onto your counter and knead by hand for 10–12 minutes. You’ll know it’s ready when the dough is smooth and elastic. It’s a bit of a workout, but the results are exactly the same.
➲ I only have active dry yeast, will that work?
Absolutely. Just dissolve it in your warm milk with a pinch of sugar first and let it sit for about 5 minutes until it gets foamy. This proves the yeast is alive and happy. Then add it to your flour mixture as directed.
➲ Can I skip the food coloring?
Of course! These taste incredible either way. Without the coloring, they’ll look more like chocolate cinnamon rolls, which is still pretty gorgeous. If you want a natural alternative, try beet powder (2–3 tablespoons), though the color will be more of a dusty pink-red.
➲ How should I store leftovers?
Keep frosted rolls in an airtight container at room temperature for up to 2 days, or pop them in the fridge for up to 5 days. For longer storage, freeze the baked, unfrosted rolls for up to 3 months, then thaw, warm, and frost when you’re ready to serve.
End of the Recipe, Start of a New Obsession
These red velvet cinnamon rolls have become my go-to whenever someone needs a little extra love in the morning. There’s something about the combination of that tender, cocoa-kissed dough and tangy cream cheese frosting that just feels like a warm hug in pastry form. They’re special enough to make any morning feel like an occasion, but the process itself is so soothing and satisfying that making them becomes part of the treat.
If you loved this recipe, you might also want to check out my:
❃ Easy Chocolate Hazelnut Crunch Cookies in 25 Minutes
❃ No-Bake Gluten Free Brownie Protein Bites (5 Ingredients!)
❃ Frosted Coffee Brownies (The Best Fudgy Recipe You’ll Make!)
❃ Healthy Chocolate Protein Donuts (Just 5 Ingredients!)
Did you give these a try? I’d love to hear how they turned out for you! Share your experience in the comments so we can all enjoy a little extra kitchen joy together. And if you’re already dreaming about your next special breakfast, don’t forget to save this recipe to Pinterest, you’ll be so happy to have it on hand when Valentine’s Day (or even a cozy Tuesday morning) comes around.
Happy baking, friend!

Red Velvet Cinnamon Rolls (Better Than the Bakery!)
Ingredients
Dough:
- 4 cups all-purpose flour
- 1/4 cup granulated sugar
- 1 packet 2 1/4 tsp instant yeast
- 1 tsp salt
- 2 tbsp unsweetened cocoa powder
- 1 cup whole milk warmed to 110°F
- 1/4 cup unsalted butter melted
- 2 large eggs room temperature
- 2 tbsp red gel food coloring
Filling:
- 1/2 cup unsalted butter softened
- 3/4 cup light brown sugar packed
- 2 tbsp ground cinnamon
- 1 tbsp unsweetened cocoa powder
Cream Cheese Frosting:
- 8 oz cream cheese softened
- 1/4 cup unsalted butter softened
- 2 cups powdered sugar
- 1 tsp vanilla extract
- 1 pinch salt
Instructions
- Make the dough by combining flour, sugar, yeast, salt, and cocoa in a stand mixer. Add warm milk, melted butter, eggs, and food coloring. Knead with dough hook for 6-8 minutes until smooth and elastic.
- Place dough in greased bowl, cover, and let rise in warm spot for 60-75 minutes until doubled.
- Mix softened butter, brown sugar, cinnamon, and cocoa for filling. Set aside.
- Roll risen dough into 16×12-inch rectangle. Spread filling evenly, leaving 1/2-inch border on one edge. Roll tightly into log and cut into 12 pieces.
- Place rolls in greased 9×13-inch pan. Cover and let rise 30-40 minutes until puffy.
- Bake at 350°F for 22-26 minutes until edges are golden. Cool 10 minutes.
- Beat cream cheese and butter until fluffy. Add powdered sugar, vanilla, and salt. Spread over warm rolls.