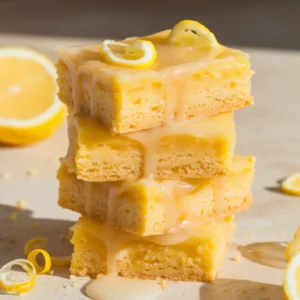
You know those moments when you’re craving something sweet but chocolate feels too heavy? That’s when these Lemon Brownie Bars come to the rescue. They’ve got all the fudgy, melt-in-your-mouth goodness of classic brownies, only brighter, lighter, and bursting with fresh lemon flavor.
The best part? They’re incredibly easy to make. No fancy tools, no fuss, just one bowl, ten minutes of prep, and you’re on your way to golden bars with crisp edges and a soft, custardy center. Think lemon bars meet blondies in the most delicious way possible.
Perfect for parties, brunches, or whenever you need a sunny pick-me-up, these bars travel beautifully, smell amazing while baking, and always impress. Whether it’s Mother’s Day, a spring get-together, or just a midweek treat, these Lemon Brownie Bars make you look (and feel) like a baking pro.
*Before You Start: You’ll find more explanation here than a basic recipe. That’s intentional, the aim is to educate, not just instruct.
Why Everyone Falls in Love with These Bars
❃ Ridiculously easy prep: Everything comes together in one bowl with just a whisk and spatula, no electric mixer required
❃ Uses ingredients you probably already have: Just butter, eggs, flour, sugar, and fresh lemons, nothing exotic or hard to find
❃ Perfect make-ahead dessert: Bake them the day before and they actually taste better after sitting overnight
❃ Lighter than traditional brownies: The lemon flavor makes them feel refreshing rather than heavy, so they’re great year-round
❃ Freezes beautifully: Stash a batch in your freezer and you’ll always have homemade dessert ready for unexpected guests
❃ Consistently gets compliments: Seriously, these are the bars that make people think you went to culinary school!
Everything That Goes into These Bright, Fudgy Bars
For the Bars:
• 1½ cups all-purpose flour. Just scoop and level, don’t pack it down
• 1 cup granulated sugar. Regular white sugar is perfect here
• ½ teaspoon baking powder. Check your container to make sure it’s still fresh
• ¼ teaspoon salt. This tiny bit makes such a difference in bringing out the lemon flavor
• ½ cup unsalted butter, melted and cooled slightly. Let it cool for about 5 minutes after melting
• 2 large eggs, at room temperature. Set them on the counter while you gather everything else
• ⅓ cup fresh lemon juice. This is usually about 2 large lemons
• 2 tablespoons lemon zest. From those same lemons; don’t skip this!
• 1 teaspoon vanilla extract. Just a touch to round out the flavors

For the Glaze:
• 1 cup powdered sugar. Sift it if yours is lumpy
• 2–3 tablespoons fresh lemon juice. Start with less, you can always add more
• ½ teaspoon lemon zest. Makes it extra pretty
Quick Notes: The fresh lemon juice really matters here. Bottled just doesn’t have that bright, sunny flavor you want. When you’re zesting your lemons, make sure to only get the yellow part, the white pith underneath is bitter. And here’s a little trick: room temperature eggs mix way more smoothly, so if you forget to take them out ahead, just pop them in a bowl of warm water for five minutes.
Let’s Bake These Lemon Brownie Bars
1 Get Everything Ready
Start by setting yourself up for success. Preheat your oven to 350°F (175°C) so it’s at the perfect temperature when your batter is ready. Line an 8×8-inch baking pan with parchment paper, leaving some overhang on two opposite sides. That little parchment “handle” will make it so much easier to lift your lemon bars out of the pan once they’ve cooled, keeping everything neat and intact.
2 Whisk Your Dry Ingredients
In a large mixing bowl, whisk together flour, sugar, baking powder, and salt until the mixture looks uniform. Take a moment to check for any lumps and break them up as you go. This step ensures even mixing, which helps your bars bake evenly and keeps the texture soft and tender.
3 Mix Up the Wet Ingredients
In a separate bowl, combine melted butter, eggs, fresh lemon juice, lemon zest, and vanilla extract. Whisk until the mixture is smooth and slightly frothy. This blend of ingredients adds that signature bright lemon flavor and a touch of richness that balances the tartness perfectly.

4 Bring It All Together
Pour the wet mixture into the bowl with your dry ingredients. Using a spatula, gently fold everything together until no streaks of flour remain. Around 20 to 25 folds should be enough. Be careful not to overmix; a gentle touch will keep your lemon bars soft and tender. The batter should look creamy, thick, and ready to pour into your prepared pan.
5 Get It in the Oven
Once your batter is ready, scrape it into the prepared pan and use a spatula to smooth the surface evenly. This helps the bars bake uniformly and gives you that clean, even top. Place the pan in the preheated 350°F (175°C) oven and bake for 25 to 28 minutes, or until the edges turn a light golden color. The center should look set but still feel slightly soft when gently touched. Avoid overbaking, these bars will continue to firm up as they cool.

6 The Hardest Part – Waiting
When the bars come out of the oven, let them cool in the pan for about 15 minutes. This short rest helps them settle and makes lifting easier. Using the parchment paper overhang, carefully lift the bars out of the pan and transfer them to a wire rack or a flat surface. Allow them to cool completely, at least 45 minutes, before you add the glaze. Patience pays off here, if the bars are still warm, the glaze will melt instead of setting nicely.
7 The Finishing Touch
In a small bowl, whisk together powdered sugar, fresh lemon juice, and lemon zest until the mixture is smooth and slightly runny. You want a drizzle consistency that spreads easily without being too thin. Pour or drizzle the glaze evenly over the cooled lemon bars, letting it flow naturally over the surface. Allow the glaze to set for 20 to 30 minutes before slicing into squares or rectangles. The result is a bright, glossy finish that adds just the right amount of sweetness to balance the tangy lemon flavor.


How to Nail These Lemon Bars Every Time
❃ Don’t overmix, seriously: Mix the batter only until the flour disappears. It might be tempting to keep stirring, but overmixing develops too much gluten, which can make your bars dense and cake-like instead of soft and tender. A light hand keeps that delicate texture just right.
❃ Fresh citrus is non-negotiable: Always use fresh lemons for both the juice and the zest. Bottled lemon juice simply can’t match the bright, complex flavor that comes from real citrus. That fresh zest is what gives these bars their signature aroma and vibrant taste.
❃ The glaze is optional, but highly recommended: It adds a sweet-tart layer of flavor that complements the lemon base beautifully. Plus, it keeps the bars moist and gives them that glossy, bakery-style finish. It’s a small extra step that makes a big difference.
❃ Watch your oven temperature: Every oven runs a little differently, so if your bars come out too dry or still gooey in the center, check your oven with a thermometer. Keeping your temperature accurate ensures perfectly baked bars every time.
❃ Make them ahead: Lemon bars actually taste even better the next day. As they rest, the flavors mellow and blend together, and the texture becomes richer. Store them covered in the fridge overnight, and you’ll wake up to an even more delicious treat.

Nutrition (Per Serving, Makes 16 Bars)
• Calories: 165
• Carbohydrates: 26g
• Protein: 2g
• Fat: 6g
• Fiber: 0g
• Sugar: 18g
• Sodium: 65mg
❃ Nutrition information is estimated and may vary depending on the specific ingredients you use.
Let’s Clear Up Anything You’re Wondering
➲ Can I make these gluten-free?
Yes! Use a good quality 1-to-1 gluten-free flour blend (the kind with xanthan gum already added). Bob’s Red Mill and King Arthur both make great ones.
➲ What’s the best way to store these?
Without the glaze, they’ll keep in an airtight container at room temperature for about 3 days. With the glaze, refrigerate for up to 5 days. You can also freeze them for up to 3 months, wrap well and thaw overnight in the fridge.
➲ Can I use lime or orange instead?
Absolutely. Lime gives a punchy, tropical twist; orange makes them mellower and sweeter. Use the same amounts of juice and zest.
➲ Help! My bars came out cake-y instead of fudgy. What happened?
That usually means overmixing or overbaking. Next time, mix less and pull them from the oven when the center still looks a bit underdone, they’ll finish cooking as they cool.
Final Thoughts (and a Little Lemon Love)
These Lemon Brownie Bars are the kind of recipe that earns a permanent spot in your rotation. They’re easy enough for a Tuesday afternoon but impressive enough for your fanciest gathering. The bright lemon flavor feels special without being overwhelming, and that fudgy texture? Just perfect.
If you’re loving the these brownie vibe, try my:
❃ Frosted Coffee Brownies (The Best Fudgy Recipe You’ll Make!)
❃ Easy Salted Caramel Swirl Brownies in Under an Hour
❃ Fudgy Cheesecake Swirl Brownies (The Easy Recipe You Need Now)
❃ Fudgy Gluten Free Zucchini Brownies in 35 Minutes
Now it’s your turn! Are you on team glaze or no glaze? Did you try any fun twists or add your own touch? I’d love to hear how it turned out, share your thoughts in the comments below!
Don’t forget to save this recipe on Pinterest so you can find it easily later, and subscribe to the newsletter for more simple, delicious, and tested recipes delivered straight to your inbox every week.
Bright & Zesty Lemon Brownie Bars for Every Occasion
Ingredients
For the Bars:
- 1½ cups all-purpose flour
- 1 cup granulated sugar
- ½ teaspoon baking powder
- ¼ teaspoon salt
- ½ cup unsalted butter melted and cooled
- 2 large eggs room temperature
- ⅓ cup fresh lemon juice
- 2 tablespoons lemon zest
- 1 teaspoon vanilla extract
For the Glaze (Optional):
- 1 cup powdered sugar sifted
- 2-3 tablespoons fresh lemon juice
- ½ teaspoon lemon zest
Instructions
- Preheat oven to 350°F (175°C). Line an 8×8-inch baking pan with parchment paper, leaving overhang on two sides for easy removal.
- In a large bowl, whisk together flour, sugar, baking powder, and salt until well combined.
- In a separate bowl, whisk melted butter, eggs, lemon juice, lemon zest, and vanilla extract until smooth and slightly frothy.
- Pour wet ingredients into dry ingredients. Gently fold with a spatula just until no flour streaks remain, about 20-25 strokes. Don’t overmix.
- Pour batter into prepared pan and smooth the top. Bake for 25-28 minutes until edges are golden and a toothpick inserted in center comes out with moist crumbs.
- Cool in pan for 15 minutes, then lift out using parchment handles. Cool completely on a wire rack, about 45 minutes.
- For glaze: whisk powdered sugar, lemon juice, and zest until smooth. Drizzle over cooled bars. Let set for 20-30 minutes before slicing.