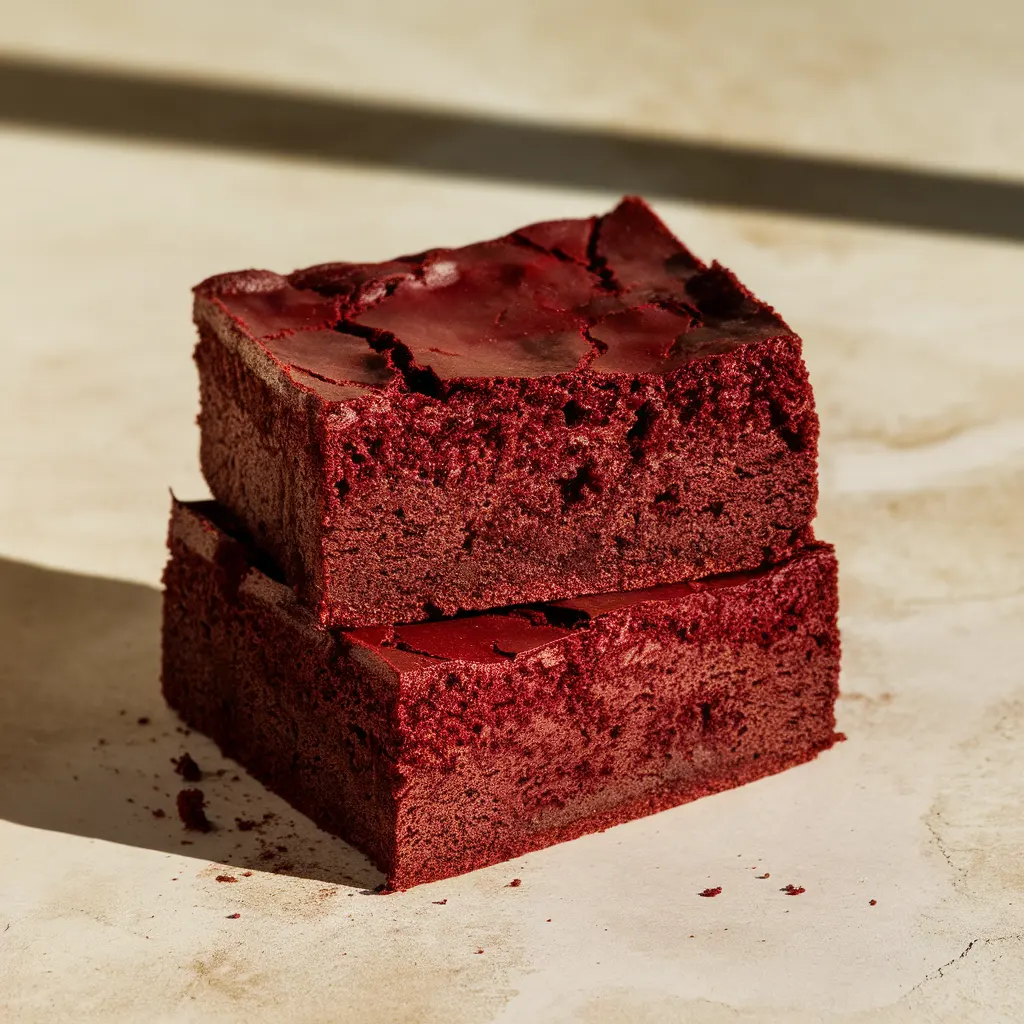
You know that moment when someone asks you to bring dessert and you immediately start spiraling about what to make? These fudgy red velvet brownies are the answer to that panic. They’re the kind of recipe that makes you look like a baking genius without actually requiring genius-level skills, just a bowl, a whisk, and about 30 minutes of your time.
What makes these special isn’t just the stunning deep red color (though trust me, that doesn’t hurt). It’s the texture, impossibly fudgy, almost truffle-like in the center, with those gorgeous crackly edges that everyone fights over. Unlike traditional red velvet cake that demands multiple bowls, careful layering, and that whole cream cheese frosting situation, these brownies keep things beautifully simple while delivering all the flavor you’re craving.
They’re perfect for Valentine’s Day when you want something romantic without the pressure, amazing for holiday gatherings when you’re already juggling seventeen other dishes, and honestly? Just great to have around on a regular Wednesday when life feels like too much and you need chocolate. The best part is watching people’s faces when they take that first bite, there’s always this moment of surprise that something this good came from something this simple.
*Before You Start: You’ll find more explanation here than a basic recipe. That’s intentional, the aim is to educate, not just instruct.
Why These Brownies Never Last More Than a Day
❃ Actually doable on a busy day: Five ingredients you probably have, one bowl you definitely have, and zero fancy equipment required
❃ Foolproof fudgy texture: Even if you accidentally overbake them a touch (we’ve all been there), they still turn out dense and delicious
❃ Instagram-worthy without trying: That vibrant red looks absolutely stunning on a plate, and people will definitely ask for the recipe
❃ Better the next day: Make them ahead and they actually improve as the flavors deepen, perfect for stress-free entertaining
❃ Freezer-friendly: Wrap them up and you’ve got emergency chocolate on standby for whenever life demands it
❃ Customizable sweetness: Want more chocolate? Less red velvet? You’re in control of the cocoa ratio
Everything That Goes Into These Brownies
For the brownies:
• 1 cup (2 sticks) unsalted butter, melted and cooled slightly. The butter is what creates that fudgy, melt-in-your-mouth texture, don’t skimp or substitute here
• 2 cups granulated sugar. This sweetness balances the cocoa and creates that signature crackly top we love
• 4 large eggs, at room temperature. Cold eggs can seize up the melted butter, so let them sit out for about 20 minutes while you gather everything else
• 2 tablespoons cocoa powder (natural, not Dutch-process). Just enough chocolate to give that red velvet flavor without overpowering the whole situation
• 1½ cups all-purpose flour. Spoon it into your measuring cup and level it off, scooping straight from the bag packs it down and makes dense, heavy brownies
• 1 tablespoon red gel food coloring. Gel is your friend here, it creates that gorgeous color without messing with the moisture balance. Find it in the baking aisle or any craft store
• 1 teaspoon vanilla extract. Real vanilla, not imitation, you’ll taste the difference
• ½ teaspoon salt. Brings out all the flavors and keeps things from tasting flat

Optional cream cheese swirl (because sometimes you want to be extra):
• 4 oz cream cheese, softened to room temperature
• ¼ cup sugar
• 1 egg yolk
• ½ teaspoon vanilla extract
Beat these together until smooth and creamy, dollop spoonfuls over your brownie batter, then drag a knife through to create beautiful swirls. It’s easier than it sounds and looks incredibly impressive.
Let’s Make These (It’s Easier Than You Think)
1 Get your oven ready and prep your pan.
Preheat to 350°F and line a 9×13-inch pan with parchment paper, making sure to leave some hanging over the sides, this becomes your handle for lifting the whole thing out later. Give the parchment a light spray or brush with butter. Even though parchment is non-stick, these brownies are so fudgy that the extra insurance really helps.
2 Start with the butter and sugar.
Pour your melted (but not scorching hot) butter into a large bowl, add the sugar, and whisk together for about 30 seconds. You’ll see it lighten up a bit and get kind of fluffy. This quick whisking step is what helps create those beautiful crackly tops that make brownies look professional.
3 Add your eggs one at a time.
This is important, crack in one egg, whisk until it’s completely mixed in, then add the next one. This gradual process keeps everything smooth and emulsified instead of turning into a separated mess. The mixture should look glossy and thick when you’re done. If your eggs were still a bit cold, don’t stress, just whisk a little longer until everything comes together.

4 Mix in the fun stuff.
Add your cocoa powder, that beautiful red gel coloring, vanilla, and salt right into the wet mixture. Whisk until the color is completely even with no streaks. Start with about a tablespoon of gel coloring and add more if you want it deeper, just know that a little goes a long way, and too much can taste slightly bitter.
5 Gently fold in the flour.
Sprinkle the flour over everything and use a rubber spatula to fold it in with a gentle touch. You want to mix until you barely see any flour streaks, a few tiny ones are fine and will disappear on their own. The folding motion (down through the middle, across the bottom, up the side) is much gentler than stirring and prevents you from developing too much gluten, which would make these cakey instead of fudgy.
6 Get it in the pan.
Pour the batter into your prepared pan and spread it out evenly, making sure to push it into all the corners. Then pick up the pan and give it a few good whacks on the counter, this releases air bubbles that could create holes while baking.

7 Bake until just barely set.
Pop it in the oven for 25–28 minutes. The edges should look firm and pull away slightly from the pan, but the center should still look a little soft and shiny when you gently shake it. A toothpick stuck in about 2 inches from the edge should have moist crumbs on it, not wet batter, but definitely not clean either. Remember, fudgy red velvet brownies keep cooking from the heat of the pan even after you take them out, so slightly underdone is actually perfect.
8 Practice patience while they cool.
This is the hardest part, but it matters. Let them cool in the pan for about 15 minutes, then use those parchment handles to lift the whole thing onto a wire rack. Give them at least 2 hours to cool completely before cutting, warm brownies taste amazing but they’re impossible to cut cleanly. For the neatest slices, refrigerate for 30 minutes before cutting, and wipe your knife clean between cuts.

Small Details That Make a Big Difference
❃ The hot knife trick actually works. Run your knife under hot water, dry it completely, then slice. The warmth helps it glide through that fudgy center without dragging. Repeat between every cut. Yes, it’s a little tedious, but the clean edges are worth it when you’re trying to impress someone.
❃ They’re honestly better the next day. Something magical happens when these sit overnight, the flavors get deeper and the texture becomes even more dense and fudgy. Store them in an airtight container at room temperature for up to 4 days, or in the fridge for a week. Chilled brownies are firmer and some people (myself included) think they’re even better that way.
❃ Avoid dry edges with this simple trick. Corners and edges always bake faster than the middle. If you notice your edges getting too done before the center sets, try placing your brownie pan on top of another baking sheet, it insulates the bottom and slows down the edge baking.
❃ Want more traditional red velvet flavor? Add ½ teaspoon of white vinegar or lemon juice along with the vanilla. Traditional red velvet has a subtle tang from buttermilk, and this tiny addition mimics that without requiring you to buy a whole container of buttermilk.
❃ Freeze them for emergency chocolate. Wrap individual brownies tightly in plastic wrap, stuff them in a freezer bag, squeeze out the air, and freeze for up to 3 months. When you need one, let it thaw for 20 minutes or microwave for 15 seconds for that warm, gooey experience.

If You’re Curious About the Nutrition
• Calories: 185
• Total Fat: 9g
• Carbohydrates: 25g
• Protein: 2g
• Fiber: 0.5g
• Sugar: 18g
• Sodium: 65mg
❃ Nutrition information is estimated and may vary depending on the specific ingredients you use.
You’re Probably Wondering…
➲ Can I use an 8×8 or 9×9 pan instead?
Definitely! Just know your brownies will be thicker, so you’ll need to bake them longer, probably 32–38 minutes. Check for doneness the same way: set edges, slightly soft center. The result will be taller, even fudgier brownies with a different ratio of crispy edges to gooey middle.
➲ What if my color isn’t coming out vibrant enough?
Different gel coloring brands have wildly different concentrations. Some need just ½ tablespoon, others need 2 tablespoons for that deep red. Add gradually, mixing completely each time to see the true color before adding more. Liquid food coloring adds extra moisture that can mess with the texture, so stick with gel.
➲ Why did my crackly top sink?
That gorgeous crust forms from the sugar and eggs, but it’s delicate when hot. Opening the oven door too early or moving the pan too roughly while it’s still warm can make it deflate. Try to resist peeking until the minimum baking time, and let the brownies sit undisturbed for at least 10 minutes before you move them.
➲ Do I have to use the food coloring?
Technically no, but then you’re making chocolate brownies, not red velvet brownies. The color is kind of the whole point! If you skip it, bump up the cocoa powder to 3–4 tablespoons so they’re more decidedly chocolate rather than that subtle cocoa flavor red velvet is known for.
One Last Thing Before You Go
Here’s the truth: these fudgy red velvet brownies have saved me more times than you can count. Last-minute potluck? Covered. Forgot about Valentine’s Day? Fixed. Just need something sweet after a long day? Done. The fact that they’re this easy and this impressive is honestly almost unfair.
If you loved how simple these were, you’ll probably also love my
❃ Frosted Coffee Brownies (The Best Fudgy Recipe You’ll Make!)
❃ Easy Red Velvet Cinnamon Rolls in Under 3 Hours (So Worth It!)
❃ Easy Lemon Brownie Bars (Ready in Just 40 Minutes!)
Did you make these? I’d truly love to hear how they turned out. Feel free to leave a rating and a comment below, especially if you added the cream cheese swirl or made them your own in any way.
Save this recipe to Pinterest so it’s there when inspiration (or a little kitchen panic) strikes, and share it with someone who could use an easy, reliable win. We all deserve a few go-to recipes we can count on.

The Best Fudgy Red Velvet Brownies (One Bowl + 30 Minutes!)
Ingredients
- 1 cup unsalted butter melted
- 2 cups granulated sugar
- 4 large eggs room temperature
- 2 tablespoons cocoa powder
- 1½ cups all-purpose flour
- 1 tablespoon red gel food coloring
- 1 teaspoon vanilla extract
- ½ teaspoon salt
Optional Cream Cheese Swirl:
- 4 oz cream cheese softened
- ¼ cup granulated sugar
- 1 egg yolk
- ½ teaspoon vanilla extract
Instructions
- Preheat oven to 350°F. Line a 9×13-inch baking pan with parchment paper, leaving overhang on the sides. Lightly grease the parchment.
- In a large bowl, whisk together melted butter and sugar for 30 seconds until slightly fluffy. Add eggs one at a time, whisking well after each addition until mixture is glossy and thick.
- Add cocoa powder, red gel coloring, vanilla, and salt to the wet ingredients. Whisk until color is completely uniform with no streaks.
- Sprinkle flour over the mixture and gently fold with a rubber spatula until just combined. A few small flour streaks are okay, don’t overmix.
- Pour batter into prepared pan and spread evenly into corners. Tap pan on counter 3-4 times to release air bubbles. If making cream cheese swirl, beat cream cheese, sugar, egg yolk, and vanilla until smooth. Dollop over batter and swirl with a knife.
- Bake for 25-28 minutes until edges are set and center is slightly soft when gently shaken. A toothpick inserted 2 inches from edge should have moist crumbs, not wet batter.
- Cool in pan for 15 minutes, then lift out using parchment overhang. Cool completely on wire rack for at least 2 hours before cutting. For cleanest cuts, refrigerate 30 minutes before slicing.