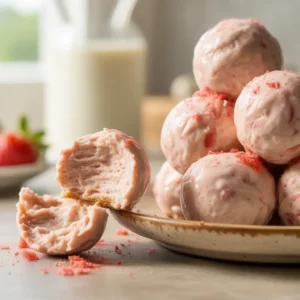
Let me tell you about the snack that’s saved me on more chaotic afternoons than anything else in my freezer: Frozen Peanut Butter Yogurt Bites. These little gems are what happens when you mix thick Greek yogurt with creamy peanut butter, sweeten it just enough with honey, and freeze it into perfect little portions. They taste like you spent way more time on them than you actually did, and honestly? That’s the kind of kitchen win we all need more of.
Here’s what makes these so brilliant: they’re soft enough to bite into straight from the freezer (no waiting around with a rock-hard popsicle situation), they’re packed with protein so they actually keep you satisfied, and you can customize them however you want. Chocolate chips? Yes. A sprinkle of sea salt? Absolutely. A drizzle of melted dark chocolate? Now we’re talking.
Whether you’re stashing these for your kids’ after-school snacks, meal-prepping for the week ahead, or just need something sweet without the guilt at 9 PM, these bites have your back. And the best part? You probably already have everything you need sitting in your kitchen right now.
*Before You Start: You’ll find more explanation here than a basic recipe. That’s intentional, the aim is to educate, not just instruct.
Why These Bites Disappear So Fast
❃ Ready in 10 minutes: Seriously. Mix, scoop, freeze. That’s your entire to-do list here.
❃ Protein that keeps you full: Greek yogurt plus peanut butter means these aren’t just empty calories. They actually stick with you.
❃ Make once, snack all week: A single batch lives happily in your freezer for weeks (if they last that long).
❃ Kid-tested, parent-approved: Soft, creamy texture that little ones can actually bite into, and you can feel good about what’s in them.
❃ Your canvas for creativity: Add chocolate, swap in almond butter, sprinkle on toppings—make them yours.
❃ No special equipment needed: Just a bowl, a mini muffin tin, and your freezer. Nothing fancy required.
The Short and Sweet Ingredient List
For the base:
• 1 cup plain Greek yogurt (Go for full-fat or 2% for the creamiest texture. Non-fat tends to freeze too icy.)
• ½ cup creamy peanut butter (The regular stirrable kind works beautifully. If you’re using natural peanut butter, mix it really well first so there’s no oil separation.)
• 3 tablespoons honey (Or maple syrup if that’s what you have, both work perfectly.)
• 1 teaspoon vanilla extract (Real vanilla makes such a difference here, but imitation will work in a pinch.)

Optional add-ins and toppings:
• 2 tablespoons mini chocolate chips (Fold these right into the mixture before freezing.)
• Melted dark chocolate (For drizzling over the tops after they’re frozen, so pretty!)
• Flaky sea salt (Just a tiny pinch on each bite before freezing. Trust me on this.)
• Crushed pretzels or chopped peanuts (Press into the tops for a little crunch.)
Storage Tip: Keep these in an airtight container with parchment paper between the layers if you’re stacking them. They’ll stay fresh in the freezer for up to 6 weeks, though in my house, they’re usually gone within a week.
Quick Substitution Notes: Peanut allergy? Swap in almond butter, cashew butter, or sunflower seed butter without missing a beat. For dairy-free, use thick coconut yogurt (the canned kind, not the drinkable stuff) and you’re all set. The texture stays beautifully creamy either way.
From Bowl to Freezer, Step by Step
1 Set up your molds.
Grab a mini muffin tin and line it with paper liners, or use a silicone mini muffin mold (which makes popping them out later super easy). You can also use small silicone candy molds or even an ice cube tray if that’s what you’ve got. The goal is to keep them bite-sized, about 1 to 1.5 tablespoons each so they’re easy to grab and eat.
2 Mix everything together.
In a medium bowl, combine your Greek yogurt, peanut butter, honey, and vanilla. Stir with a sturdy spoon or spatula until everything is completely smooth and there are no streaks of peanut butter running through. This usually takes a minute or two. If your peanut butter is super thick or cold, pop it in the microwave for about 10 seconds first, it’ll make mixing so much easier.

3 Taste and adjust.
Here’s your moment to make sure the sweetness is just right. Grab a clean spoon and taste the mixture. Remember, things taste a little less sweet when they’re frozen, so you want it to be just slightly sweeter than you’d normally go for. Need more? Stir in another tablespoon of honey.
4 Fold in any extras.
If you’re adding mini chocolate chips, chopped nuts, or anything fun, fold them in now. Stir gently so everything gets distributed evenly. If you’re doing toppings like flaky salt or crushed pretzels instead, you’ll add those after scooping.

5 Fill your molds.
Use a small cookie scoop (the tablespoon-sized ones are perfect) or a regular teaspoon to portion the mixture into your molds. Fill each spot about three-quarters full. They won’t expand or anything, but leaving a little room at the top makes them easier to pop out later. Smooth the tops with the back of your spoon if you want them to look pretty.
6 Add your toppings.
This is when you’d sprinkle on anything you want on top: a pinch of flaky sea salt, a few extra chocolate chips pressed into the surface, or a sprinkle of chopped nuts. Just press them in gently so they stick.
7 Freeze until firm.
Pop the whole tray into your freezer on a flat surface and let them freeze for at least 3 hours. You want them completely solid so they hold their shape when you remove them from the molds, but they’ll still be soft enough to bite into right away, no rock-hard frozen situation here.
8 Pop them out and store.
Once they’re frozen solid, remove the bites from the molds. If you used paper liners, just peel them off. Silicone molds? Push gently from the bottom and they’ll pop right out. Transfer everything to an airtight container or freezer bag, and if you’re stacking them, put a piece of parchment paper between the layers. Keep them in the freezer and grab them whenever you need a quick snack.
Little Tricks for Creamier Bites
❃ Your yogurt matters more than you think. The thicker your Greek yogurt, the creamier these will be. If your yogurt looks watery or thin, strain it through a fine-mesh sieve lined with cheesecloth for about 20 minutes first. It removes the excess liquid and makes all the difference.
❃ Warm your peanut butter slightly. Cold, stiff peanut butter doesn’t blend smoothly with cold yogurt. Microwave it for 10–15 seconds until it’s loose and pourable, then stir it in. You’ll get a much smoother mixture without any lumps.
❃ Mini muffin tins are your best friend. They create the perfect bite-sized portions that freeze quickly and are easy to pop in your mouth. Larger portions take forever to freeze and can be awkward to eat.
❃ Always taste before you freeze. Once they’re solid, there’s no going back. Taste the mixture while it’s still soft and make any adjustments to sweetness or flavor before scooping.
❃ The chocolate drizzle trick. Want to make these feel extra special? Melt 2 ounces of dark chocolate with a teaspoon of coconut oil, then use a fork to drizzle it over the frozen bites. Pop them back in the freezer for 5 minutes to set. It looks gorgeous and tastes even better.

What You’re Actually Eating
• Calories: 95
• Total Carbohydrates: 9g
• Protein: 4g
• Total Fat: 5g
• Fiber: 0.5g
• Sugar: 7g
• Sodium: 30mg
❃ Nutrition information is estimated based on standard ingredient measurements and may vary depending on the brands and specific ingredients you use.
Questions You’re Probably Asking
➲ Can I use regular yogurt instead of Greek yogurt?
You can, but fair warning, the texture won’t be quite as creamy. Regular yogurt has more water in it, so your bites might freeze a bit icier. If regular yogurt is all you have, strain it through cheesecloth for 30 minutes to thicken it up first, or add an extra tablespoon of peanut butter to help with the texture.
➲ How long do these actually last in the freezer?
Stored in an airtight container, these Frozen Peanut Butter Yogurt Bites stay fresh for up to 6 weeks. After that, they’re still safe to eat but might develop a bit of freezer burn or lose some of that creamy texture. Label your container with the date so you can keep track.
➲ Can I make these dairy-free?
Absolutely! Swap the Greek yogurt for thick coconut yogurt, the kind that comes in a can, not the drinkable stuff. Make sure your peanut butter doesn’t have any sneaky dairy ingredients, and use maple syrup instead of honey if you want to keep it vegan. The texture will be slightly denser but still delicious.
➲ Why are mine too hard to bite into?
This usually happens when you use non-fat or low-fat yogurt, which freezes much icier than full-fat or 2% varieties. The fat in both the yogurt and peanut butter is what keeps these soft and scoopable straight from the freezer. Next time, go for a yogurt with at least 2% fat, and make sure you’re not using a low-fat or powdered peanut butter.
One Last Reason to Try These
These Frozen Peanut Butter Yogurt Bites are proof that the simplest recipes really are the best. Four ingredients, ten minutes of your time, and you’ve got a freezer full of snacks that taste like a treat but keep you fueled. They’re the kind of recipe you’ll make over and over because they’re almost effortless and they deliver every single time.
If these hit the spot for you, you’ll probably love my:
❃ Pumpkin Cheesecake Balls! The Perfect Fall Treat
❃ Easy Red Velvet Cinnamon Rolls in Under 3 Hours (So Worth It!)
❃ Easy Chocolate Hazelnut Crunch Cookies in 25 Minutes
❃ Homemade Cinnamon Roll Bites: The Lazy Baker’s Secret Weapon
I’d love to hear what you think! Leave a comment and tell me what mix-ins you tried, or if you came up with a genius flavor combo of your own. And if this is a recipe you’ll want to make again, be sure to save it to your Pinterest board so it’s easy to find later. They’re honestly too good not to keep close (even if you eat most of them yourself first 😉).

Protein-Packed Frozen Peanut Butter Yogurt Bites
Ingredients
- 1 cup plain Greek yogurt full-fat or 2%
- 1/2 cup creamy peanut butter
- 3 tablespoons honey
- 1 teaspoon vanilla extract
- 2 tablespoons mini chocolate chips optional
- Flaky sea salt for topping optional
Instructions
- Line a mini muffin tin with paper liners or use a silicone mold. Set aside.
- In a medium bowl, combine Greek yogurt, peanut butter, honey, and vanilla extract. Stir until completely smooth with no streaks, about 1-2 minutes. If peanut butter is stiff, microwave it for 10 seconds first.
- Taste the mixture and adjust sweetness if needed. Remember it should taste slightly sweeter than you’d like since freezing dulls flavors.
- If using chocolate chips or mix-ins, fold them in gently until evenly distributed.
- Use a tablespoon-sized cookie scoop or teaspoon to portion mixture into prepared molds, filling each about three-quarters full. Smooth tops with back of spoon.
- Add any toppings like flaky sea salt or extra chocolate chips, pressing gently to adhere.
- Freeze on a flat surface for at least 3 hours until completely solid.
- Pop bites out of molds and transfer to an airtight container or freezer bag with parchment paper between layers. Store in freezer for up to 6 weeks.
Notes
- Use almond butter, cashew butter, or sunflower seed butter instead of peanut butter
- Swap honey for maple syrup (vegan option)
- For dairy-free: use thick coconut yogurt from a can