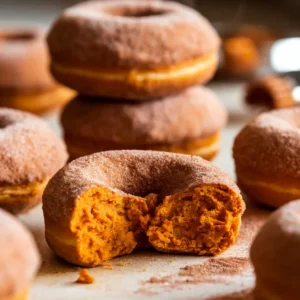
Look, gluten free pumpkin donuts shouldn’t taste like cardboard, and these definitely don’t. They’re actually soft—like, genuinely fluffy—with that perfect balance of pumpkin flavor and warm spices that makes fall baking worth the effort. The cinnamon sugar coating gets a little crispy on the outside while the inside stays tender, and honestly? They’re better the next day.
No stand mixer, no waiting for dough to rise, no frying oil splattering everywhere. Just mix everything in one bowl, pour it into a donut pan, and bake. Takes about 25 minutes total, which means you can realistically make these on a Tuesday morning before work if you’re feeling ambitious. Or do what most people do—make a double batch on Sunday and freeze half for later.
*Before You Start: You’ll find more explanation here than a basic recipe. That’s intentional—the aim is to educate, not just instruct.
Why These Pumpkin Donuts Are Worth Turning On the Oven For
❃ They actually stay soft: Most gluten-free baked goods turn into rocks by day two. These stay tender for at least three days thanks to the pumpkin.
❃ One bowl, no fuss: Everything mixes together in about five minutes. No creaming butter, no complicated steps.
❃ Baked, not fried: Less mess, less oil, and honestly a better texture. Fried gluten-free things can get weirdly greasy.
❃ Freezer-friendly for real: Make ahead and pull them out whenever. They thaw perfectly and taste fresh after a quick warm-up.
❃ Easy to make dairy-free: Swap butter for coconut oil and you’re done. The texture doesn’t change at all.
❃ Kid-tested: The cinnamon sugar coating makes these feel like a treat without being candy-level sweet.
What You’ll Need to Make Them
For the Donuts:
• 1 ¾ cups gluten-free all-purpose flour blend – Use Bob’s Red Mill 1-to-1 or King Arthur Measure for Measure. Both have xanthan gum already in them, which you need for structure. If yours doesn’t list xanthan gum, add ½ teaspoon.
• 1 teaspoon baking powder
• ½ teaspoon baking soda – Fresh stuff only. If it’s been sitting in your cabinet since 2019, grab a new box.
• 1 ½ teaspoons ground cinnamon
• ½ teaspoon ground nutmeg – The real stuff tastes better if you have it.
• ¼ teaspoon ground ginger
• ¼ teaspoon salt
• ¾ cup pumpkin puree – Canned is perfect. Just check the label—you want 100% pumpkin, not pie filling with all the spices and sugar added.
• ½ cup packed light brown sugar – Don’t use white sugar here. Brown sugar adds moisture and a subtle molasses flavor that works with the pumpkin.
• ¼ cup melted butter – Let it cool for a minute so it doesn’t cook the eggs when you mix everything.
• 2 large eggs, room temperature – Cold eggs don’t blend as smoothly. If you forget to take them out, just stick them in a bowl of warm water for five minutes.
• ⅓ cup whole milk – Any milk works—almond, oat, regular, whatever you’ve got.
• 1 teaspoon vanilla extract

For the Cinnamon Sugar Coating:
• ¼ cup melted butter
• ½ cup granulated sugar
• 1 tablespoon ground cinnamon
Quick Notes:
The gluten-free flour blend matters here. Don’t try to substitute with almond flour or coconut flour—they absorb liquid completely differently and you’ll end up with a mess. Stick with a 1-to-1 baking blend.
Got leftover pumpkin puree? Freeze it in ¼ cup portions in a muffin tin, then pop them out and store in a freezer bag. Perfect for smoothies or my gluten-free pumpkin bread recipe.
If you don’t have all the individual spices, you can use 2 teaspoons of pumpkin pie spice instead. Not quite as nuanced, but it works in a pinch.
Let’s Bake — Step-by-Step So You Nail It the First Time
1 Get your oven ready
Heat it to 350°F and grease your donut pan really well—like, don’t be shy with the cooking spray or butter. Gluten-free batters stick more than regular ones, and there’s nothing worse than donuts that break apart when you’re trying to get them out of the pan.
2 Whisk the dry stuff
Grab a big bowl and whisk together your gluten-free flour, baking powder, baking soda, all the spices, and salt. Make sure you break up any clumps—gluten-free flour loves to stick together. This also makes sure your baking powder gets distributed evenly so you don’t end up with one giant donut and five sad flat ones.

3 Mix the wet ingredients
In another bowl, whisk the pumpkin, brown sugar, melted butter, eggs, milk, and vanilla until it’s smooth. Should look like thick pancake batter. If your eggs were cold, you might see little butter bits—that’s fine, they’ll melt in the oven.

4 Combine everything
Pour the wet mixture into the dry ingredients and stir with a spatula until just combined. The batter will be thick but still pourable. Don’t overmix it—once you stop seeing dry flour, you’re done. Overmixing gluten-free batter activates all the starches and makes things gummy.
5 Fill the pan
Easiest way is to put the batter in a zip-top bag, snip off one corner, and pipe it into the donut cavities. Fill them about two-thirds full—if you go higher, the center holes will bake shut and you’ll have pumpkin muffins instead of donuts. Not the end of the world, but not what we’re going for.
6 Bake them
12 to 14 minutes, until the tops bounce back when you poke them gently and a toothpick comes out clean. Start checking at 11 minutes if your oven tends to run hot. Gluten-free stuff can go from perfectly done to dry really fast.
7 Cool briefly
Let them sit in the pan for about 3 or 4 minutes—just long enough that they’re not falling apart when you touch them. Then flip the pan over onto a cooling rack. If any stick, run a butter knife around the edges. Let them cool another 5 minutes before coating.

8 Do the cinnamon sugar thing
Brush each donut with melted butter—get all the surfaces. Then roll them in the cinnamon sugar mixture, pressing lightly so it sticks. Work while they’re still warm. Once they cool down, the coating won’t stick as well.

Want Them Perfect? Here’s What to Know
❃ Weigh your flour if you can. Gluten-free flour is notoriously inconsistent when you measure by volume. 1 ¾ cups should be around 245 grams. Too much flour = dry and crumbly. Too little = dense and weird.
❃ Check your flour blend for xanthan gum. Most 1-to-1 blends include it, but some don’t. Without it, your donuts will literally crumble apart. Not fun.
❃ Make them dairy-free easily. Use refined coconut oil instead of butter (the refined kind doesn’t taste like coconut) and any non-dairy milk you like. Everything else stays the same.
❃ Play with the spices. Some people find cinnamon overwhelming. Try cutting it to 1 teaspoon in the batter and adding ¼ teaspoon cardamom instead. Totally different vibe, still delicious.
❃ Store them right. Airtight container at room temperature for up to 3 days. Want to freeze them? Skip the coating, freeze in a single layer, then bag them up. They’ll keep for 3 months. Thaw, warm them in a 300°F oven for 5 minutes, then do the butter and cinnamon sugar thing fresh.

Nutritional Breakdown (Per Donut)
• Calories: 185
• Carbohydrates: 28g
• Protein: 3g
• Fat: 7g
• Fiber: 2g
• Sugar: 15g
• Sodium: 180mg
❃ Nutrition info is estimated and may vary based on the specific brands and products you use.
Questions You’ll Probably Have
➲ What if I don’t have a donut pan?
Use a muffin tin. Bake for 15–17 minutes instead. You’ll get pumpkin muffins with the same flavor—just no hole in the middle. Still good, just different.
➲ Why did mine turn out dense and gummy?
Usually it’s one of two things: too much flour (seriously, get a kitchen scale) or overmixing the batter. Gluten-free batters need a light touch. Also make sure your baking powder and baking soda aren’t ancient—expired leaveners won’t give you any rise.
➲ Can I make the batter ahead?
Technically yes, but they won’t rise as well. The baking powder starts working as soon as it hits liquid. If you need to prep ahead, you can refrigerate the batter for up to 4 hours. Let it sit out for 10 minutes before baking and add a minute or two to the bake time.
➲ How do I reheat frozen ones?
Thaw overnight in the fridge or leave them out for a couple hours. Warm in a 300°F oven for about 5 minutes, then brush with melted butter and roll in fresh cinnamon sugar. They’ll taste like you just made them.
So, Are These Donuts Worth It? Absolutely.
These gluten free pumpkin donuts are proof that you don’t need gluten to make something that actually tastes good. They’re soft, they’ve got flavor, and they don’t fall apart when you pick them up. The pumpkin keeps them from drying out like a lot of gluten-free baked goods tend to do, and the spices are warm without being overwhelming.
If these worked for you, check out my:
❃ Easy Chocolate Yeast Donuts (No Donut Pan Needed!)
❃ Easy Blueberry Glazed Donuts in 30 Minutes (Baked, Not Fried!)
❃ Baked Vegan Donuts That Are Fluffy & Easy In 7-Steps
❃ New York Style Gluten Free Bagel Recipe (No Weird Texture!)
Let me know in the comments if you make these—did you add extra spices or put your own twist on them? I love hearing what works for people. And if you want to come back to this recipe later (or share it with friends who’d love it too), save it to Pinterest so you can find it again anytime.
The Best Gluten Free Pumpkin Donuts (No Mixer!)
Ingredients
For the Donuts:
- 1 ¾ cups gluten-free all-purpose flour blend
- 1 teaspoon baking powder
- ½ teaspoon baking soda
- 1 ½ teaspoons ground cinnamon
- ½ teaspoon ground nutmeg
- ¼ teaspoon ground ginger
- ¼ teaspoon salt
- ¾ cup pumpkin puree
- ½ cup packed light brown sugar
- ¼ cup melted butter
- 2 large eggs room temperature
- ⅓ cup whole milk
- 1 teaspoon vanilla extract
For the Coating:
- ¼ cup melted butter
- ½ cup granulated sugar
- 1 tablespoon ground cinnamon
Instructions
- Preheat oven to 350°F and generously grease a 6-cavity donut pan with cooking spray or butter.
- In a large bowl, whisk together gluten-free flour, baking powder, baking soda, cinnamon, nutmeg, ginger, and salt until no lumps remain.
- In a separate bowl, whisk pumpkin puree, brown sugar, melted butter, eggs, milk, and vanilla until smooth and well combined.
- Pour wet ingredients into dry ingredients and stir with a spatula until just combined. Don’t overmix—a few small streaks of flour are fine.
- Transfer batter to a piping bag or zip-top bag with corner snipped off. Pipe batter into donut cavities, filling each about ⅔ full.
- Bake 12-14 minutes until tops spring back when lightly pressed and a toothpick comes out clean. Cool in pan 3-4 minutes, then turn out onto wire rack.
- While donuts are still warm, brush with melted butter and immediately roll in cinnamon-sugar mixture until fully coated.