Chocolate yeast donuts might seem like professional baker territory. Industrial fryers. Dough sheeters. A recipe best left to the experts. But they are actually way more forgiving than you think.
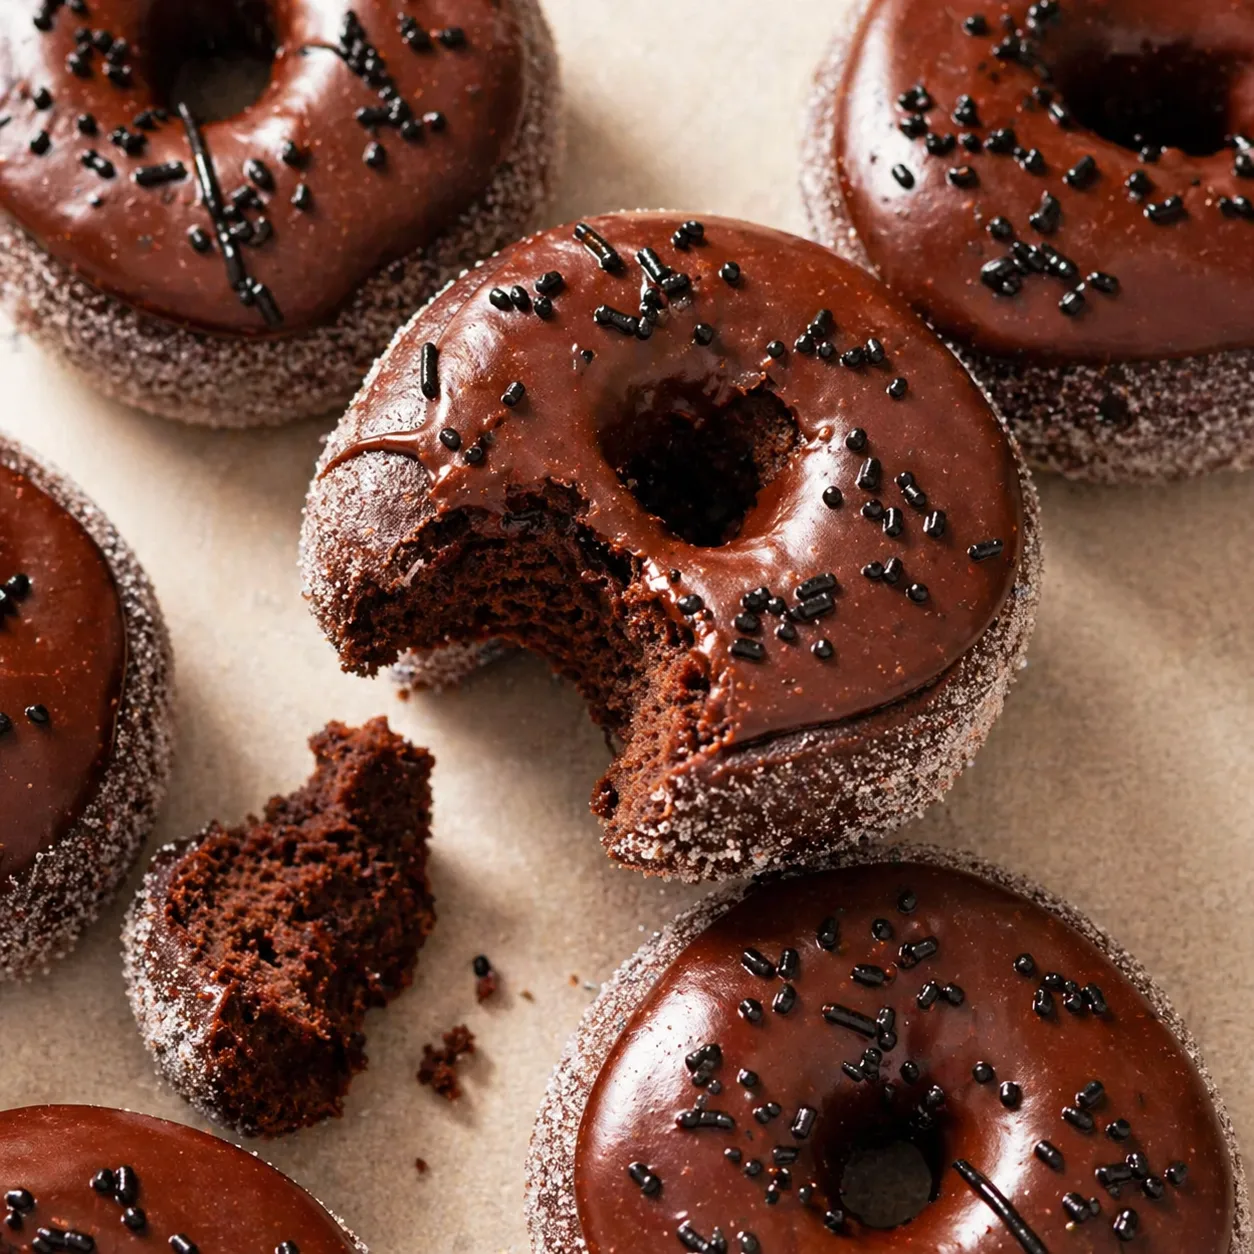
The secret is understanding what happens at each stage, not just following instructions blindly. When you nail these, you get an incredibly soft, almost impossibly light texture. Nothing like those dense cake donuts. The chocolate flavor comes through without being overwhelming. And fresh out of the fryer? Better than anything you will ever buy.
No special equipment. No weird ingredients. Just straightforward technique and a little patience. Mostly the kind where you wait for dough to rise while you are doing other things. Perfect for beginners or anyone who has made bread before.
So wash your hands and clear some counter space. These donuts are about to make you feel like a professional anyway. And that first bite? Worth every minute.
A Quick Heads-Up: You’ll notice a bit more detail here than in your average recipe. That’s because I want to help you master the why behind the how. Think of this as a mini-masterclass, we’re here to build your skills, not just fill your plate.
Why You’ll Never Go Back to Store-Bought After This
❃ Real measurements that make sense: Everything’s been tested multiple times, not just thrown together for content
❃ Works with grocery store ingredients: No hunting down special flour or imported chocolate
❃ The dough is forgiving: Mess up the first rise? It’ll still work. Oil temp drops? You’ll recover
❃ Make them tonight or tomorrow: Flexible timing means you can start the dough now and fry tomorrow morning
❃ Detailed troubleshooting built in: If something looks off, you’ll know what to adjust
❃ Tastes like actual chocolate: Not that weird artificial cocoa flavor some recipes have
What You Actually Need (and Nothing Weird)
For the Donuts:
• 3¾ cups all-purpose flour (470g, weigh it if you have a scale, you’ll get more consistent results)
• ⅓ cup Dutch-process cocoa powder (the dark stuff, not Hershey’s, Rodelle or Guittard work great)
• ¼ cup granulated sugar (50g)
• 2¼ teaspoons instant yeast (that’s one packet, or just eyeball it, yeast is forgiving)
• 1 teaspoon salt (fine sea salt or table salt, not coarse kosher)
• ¾ cup whole milk, warmed (110°F, warm to the touch but not hot enough to make you yank your finger back)
• 2 large eggs (take them out of the fridge 30 minutes before, cold eggs slow everything down)
• 3 ounces dark chocolate, melted (60-70% cacao, the baking bars work fine, don’t overthink it)
• 4 tablespoons unsalted butter, softened (just leave it on the counter while you gather everything else)
• Neutral oil for frying (vegetable or canola, you’ll need about 2 quarts)

For the Glaze:
• 2 cups powdered sugar
• 3-4 tablespoons milk (start with 3, add more if it’s too thick)
• 2 tablespoons cocoa powder
• 1 teaspoon vanilla
• Tiny pinch of salt
Quick Note: If you only have natural cocoa powder, it’ll work but the color won’t be as dark. Butter can be salted if that’s what you have, just skip the added salt in the dough. Oat milk and almond milk both work fine as dairy substitutes, just use the unsweetened kind.
Let’s Make Some Donuts! Step by Step
1 Get the dry stuff together
Whisk your flour, cocoa powder, sugar, yeast, and salt in a big bowl. Really whisk it, you want the cocoa distributed evenly or you’ll get bitter pockets. This takes maybe 30 seconds but makes a difference.
2 Mix in the wet ingredients
Combine your warm milk, eggs, and melted chocolate in another bowl. Dump that into the dry ingredients along with the butter. Stir it with a wooden spoon or use a stand mixer with the dough hook. It’ll look shaggy and rough, that’s normal. Keep mixing until everything’s incorporated and you don’t see dry flour pockets anymore.

3 Knead it out
This is where the magic happens. If you’re using a stand mixer, let it run on medium speed for 8-10 minutes. By hand, knead on a floured counter for about 12 minutes. You’re looking for smooth dough that’s slightly tacky but doesn’t stick to everything. It should bounce back when you poke it. The chocolate makes it darker than regular bread dough, so you can’t judge by color, go by feel. If it’s super sticky, add a tablespoon of flour at a time, but don’t go crazy. Too much flour means tough donuts.

4 First rise
Shape it into a ball, toss it in a greased bowl, and cover with a towel or plastic wrap. Find a warmish spot, on top of your fridge works, or inside the oven with just the light on. Let it double in size. This usually takes 90 minutes but could be longer if your kitchen’s cold. You’ll know it’s ready when you poke it and the indent stays.
5 Roll and cut
Punch the dough down (literally just press your fist into it) and dump it onto a floured surface. Roll it out to about ½-inch thick. Use a 3-inch round cutter for the donuts and a 1-inch for the holes. Don’t have cutters? A drinking glass and a shot glass work. Gather the scraps gently, press them together without kneading too much, and cut more. Put them on parchment paper with space between each one.
6 Second rise (don’t skip this)
Cover them loosely and let them puff up for 30-45 minutes. They should look noticeably bigger and feel airy when you touch them. This rise is what makes yeast donuts different from cake donuts. Skip it and you’ll get dense, greasy results. Seriously, don’t skip it.
7 Heat your oil
Fill a heavy pot with 2-3 inches of oil. Heat it to 360°F, use a thermometer. This isn’t optional if you want good results. Too hot and the outside burns while the inside stays raw. Too cool and they absorb oil like crazy. Keep the heat at medium and adjust as you go to maintain temperature.
8 Fry them
Drop 2-3 donuts in at a time. They’ll sink, then float. Fry about 90 seconds per side, they won’t get super dark because of the chocolate, so judge by how puffy they look. Flip with a slotted spoon or spider. When they’re done, they’ll feel light and mostly firm when you tap them. Don’t crowd the pot or the temperature drops too much.

9 Glaze while warm
Put them on a cooling rack over paper towels to drain. While they’re still warm but not hot, dip the tops in the glaze. Let the excess drip off. The glaze will set as they cool. Eat them the same day, yeast donuts don’t keep well.

Little Things That Make a Big Difference
❃ Your thermometer matters: Oil temperature is everything. Get a cheap instant-read thermometer if you don’t have one. Guessing doesn’t work.
❃ The second rise is non-negotiable: This is the hill worth dying on. That final proof creates the air pockets that make these light instead of dense.
❃ Fry a test donut hole first: Before you commit your whole batch, fry one hole. Check if the inside’s cooked, adjust your heat if needed. Two minutes saves the whole batch.
❃ Cold fermentation is your friend: After the first rise, you can refrigerate the dough overnight. Next day, let it sit out 30 minutes before rolling. The flavor actually improves.
❃ Glaze consistency: It should coat a spoon but drip slowly. Add milk by the teaspoon to thin it out. Too thin and it slides right off.

Common Donut Questions, Straight Answers
• Calories: 285
• Carbs: 42g
• Protein: 5g
• Fat: 11g
• Fiber: 2g
• Sugar: 18g
• Sodium: 210mg
❃ These numbers are estimates. Your actual nutrition will vary based on brands, frying oil absorption, and how thick you roll the dough.
Questions People Always Ask
➲ Can I bake these instead?
Yeah, but they won’t taste like donuts, they’ll be more like chocolate buns. Not bad, just different. Bake at 375°F for 12-15 minutes. Brush with butter right when they come out to keep them soft.
➲ Mine turned out heavy and greasy. What happened?
Usually it’s one of three things: oil wasn’t hot enough, you skipped or rushed the second rise, or your yeast was old and didn’t create enough lift. Check your oil temp with a thermometer next time and make sure those donuts are properly proofed before frying.
➲ How do I store leftovers?
Honestly, these are best the day you make them. If you have extras, keep them in an airtight container at room temperature. They’ll be okay the next day but start getting stale. Don’t refrigerate, that makes them stale faster.
➲ Can I freeze them?
Absolutely. Freeze them unglazed after they’re completely cool. Stack them with parchment between layers in a freezer bag. They keep for 2 months. Thaw at room temperature, warm in a 300°F oven for 5 minutes, then glaze. Don’t freeze glazed donuts, the coating gets weird.
➲ What do I do with the frying oil after?
Let it cool completely, strain it through a coffee filter or cheesecloth into a jar, and you can reuse it 2-3 times. When it starts smelling off or gets too dark, let it solidify and throw it in the trash. Never pour it down your sink.
A Few Words Before You Grab That First Bite
Here’s the thing about homemade chocolate yeast donuts, they take time, but most of that time is just waiting around. The actual hands-on work is maybe 30 minutes total. And once you’ve made them a couple times, you’ll get a feel for what the dough should look like at each stage. Then it becomes almost automatic.
The first batch might not be perfect. Maybe your oil temp fluctuates or the donuts don’t look exactly like the picture in your head. That’s fine. They’ll still taste amazing, and you’ll figure out what to adjust next time. That’s how cooking actually works.
If you’re into this kind of thing, you might also want to check out my:
❃ Easy Blueberry Glazed Donuts in 30 Minutes (Baked, Not Fried!)
❃ Homemade Cinnamon Roll Bites: The Lazy Baker’s Secret Weapon
❃ Salted Caramel Truffles: Better Than Store-Bought (30 Min!)
❃ Healthy Dark Chocolate Energy Balls Recipe (Just 5 Ingredients)
Made these? Tell me how it went in the comments. Did your first batch turn out perfect or was it a learning experience? Either way, drop a comment and let me know what you’d make next. Pin it so you don’t loss it!
The Best Chocolate Yeast Donut Recipe You’ll Ever Try
Ingredients
- 3¾ cups all-purpose flour
- ⅓ cup Dutch-process cocoa powder
- ¼ cup granulated sugar
- 2¼ teaspoons instant yeast
- 1 teaspoon fine salt
- ¾ cup whole milk warmed to 110°F
- 2 large eggs room temperature
- 3 ounces dark chocolate melted and cooled
- 4 tablespoons unsalted butter softened
- Vegetable or canola oil for frying
- 2 cups powdered sugar
- 3 tablespoons whole milk
- 2 tablespoons cocoa powder
- 1 teaspoon vanilla extract
- Pinch of salt
Instructions
- Whisk flour, cocoa powder, sugar, yeast, and salt in a large bowl until well combined.
- Mix warm milk, eggs, and melted chocolate in a separate bowl. Add to dry ingredients along with softened butter. Mix until a shaggy dough forms.
- Knead dough for 8-10 minutes in a stand mixer or 12 minutes by hand until smooth and elastic. Dough should be slightly tacky but not sticky.
- Place dough in a greased bowl, cover, and let rise in a warm spot for 90 minutes or until doubled in size.
- Punch down dough and roll out on a floured surface to ½-inch thickness. Cut with a 3-inch round cutter and 1-inch center cutter.
- Place cut donuts on parchment-lined baking sheets, cover loosely, and let rise 30-45 minutes until puffy.
- Heat oil to 360°F in a heavy pot. Fry donuts 2-3 at a time for 90 seconds per side until cooked through. Drain on a wire rack.
- Whisk together powdered sugar, milk, cocoa powder, vanilla, and salt for glaze. Dip warm donuts in glaze and let set on cooling rack.