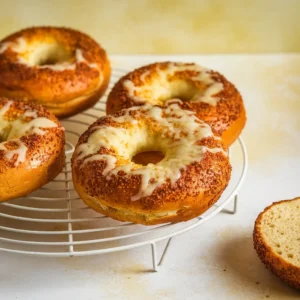
The first time you bite into a warm asiago bagel fresh from your own oven, you’ll wonder why you ever bothered with the grocery store version. These aren’t just good for homemade – they’re legitimately better than what most bakeries sell, with that perfect chewy-but-not-tough texture and real cheese flavor that doesn’t taste like it came from a packet.
Look, making bagels sounds intimidating, but it’s honestly just bread with an extra step. The “boiling” part freaks people out, but it takes maybe 10 minutes total and makes all the difference between a sad, dense roll and an actual bagel. Most of your time is hands-off anyway – the dough does its thing while you binge Netflix or catch up on laundry.
This recipe works for busy people because most of it happens overnight. You can mix the dough after dinner, shape the bagels before bed, and wake up to that amazing yeast smell wafting from your fridge. Sunday bagel prep means you’ve got real breakfast all week, not whatever sad desk pastry you grabbed on the way to work.
*Before You Start: You’ll find more explanation here than a basic recipe. That’s intentional, the aim is to educate, not just instruct.
Here’s the Part Where I Convince You These Bagels Are Worth It
❀ The overnight thing isn’t just fancy chef nonsense: it genuinely makes them taste better and gives you flexibility with timing
❀ You don’t need special flour or weird ingredients: bread flour from any grocery store works perfectly
❀ Mistakes are pretty forgiving: even slightly wonky-shaped bagels taste amazing
❀ They freeze like champs: make a double batch and you’re set for weeks
❀ Way cheaper than buying good ones: we’re talking maybe 50 cents each versus $3+ at decent bakeries
❀ Actually easier than most bread recipes: no multiple rises or complicated shaping techniques
Let’s Talk Ingredients Before You Make a Grocery Run
For the Dough:
• 4 cups (480g) bread flour, plus extra for dusting
• 1½ teaspoons instant yeast (or active dry – just dissolve it in the warm water first)
• 2 teaspoons kosher salt
• 1 tablespoon sugar (helps the yeast wake up and gives better browning)
• 1¼ cups warm water (around 110°F) (should feel like a nice bath – not hot)
• 2 tablespoons olive oil

For the Good Stuff:
• 1 cup freshly grated asiago cheese, divided (seriously, don’t use the pre-shredded – it doesn’t melt right)
• 1 large egg, beaten (for that shiny top)
• 2 tablespoons coarse sea salt (the big chunky kind – optional but so worth it)
• 2 tablespoons barley malt syrup or honey (for the boiling water – this is what makes them actually bagels)
Quick Ingredient Notes:
Bread flour really does matter here – the extra protein gives you that chewy bite. All-purpose works in a pinch but you’ll get more of a dinner roll vibe. For the asiago, hit up the deli counter if your grocery store has one – they’ll often grate it fresh for you. Barley malt syrup sounds fancy but most health food stores have it, and Amazon definitely does. Honey works too but the flavor’s a bit different.
Okay, Here’s Exactly How We’re Doing This
⤷ Mix Everything Together
Dump the flour, yeast, salt, and sugar into a big mixing bowl and whisk it around. Make a little crater in the middle and pour in the warm water and olive oil. Mix it with a wooden spoon or just use your hands – it’s going to look pretty shaggy and rough, which is totally normal. Don’t stress about making it smooth yet.
⤷ Knead Like You Mean It
Turn that messy dough out onto your counter with a little flour and start kneading. This takes about 8-10 minutes of actual work – you’ll know it’s done when the dough feels smooth and bounces back when you poke it. If it’s sticking to everything, add a bit more flour. If your hands are getting a workout, you’re doing it right.

⤷ Add the Cheese
Flatten your nice smooth dough into a rectangle and scatter about ¾ cup of that grated asiago all over it. Fold it up like you’re folding a letter, then knead it just enough to get the cheese mixed in. Some pieces will stick out – that’s perfect because they’ll get all melty and golden later.
⤷ Let It Rise
Plop the dough in an oiled bowl, flip it once so all sides get a little oil, then cover with a damp towel. Find a warmish spot (on top of the fridge works great) and let it double in size. This takes 1-2 hours usually. You’ll know it’s ready when you can poke it and your finger leaves a dent that doesn’t bounce back.
⤷ Make the Bagel Shapes
Cut your risen dough into 8 pieces – they don’t have to be perfect. Roll each piece into a ball, then stick your thumb right through the middle and stretch the hole to about 2 inches wide. It looks ridiculously big but trust the process – they shrink up during the next steps.

⤷ The Magic Overnight Wait
Line some baking sheets with parchment and arrange your bagels on them. Cover tightly with plastic wrap and stick them in the fridge overnight. This slow rise is where all the good flavor happens – you can leave them up to 48 hours if life gets in the way.
⤷ Boil Then Bake
Take the bagels out about 30 minutes before you want to cook them. Get a big pot of water boiling with that malt syrup or honey in it. Drop each asiago bagel in for 90 seconds per side – they’ll puff up a little and get shiny. Fish them out, brush with beaten egg, sprinkle with the remaining cheese and some coarse salt if you’ve got it. Bake at 425°F for about 20-25 minutes until they’re golden brown and sound hollow when you tap them.


The Details That Turn Good Bagels Into Great Ones
❀ Don’t skip the boiling step – this is literally what turns bread into bagels. That quick dip in hot water creates the shiny skin that gets crispy while keeping the inside chewy. Without it, you just made round bread rolls.
❀ Fresh cheese is everything – those bags of pre-shredded stuff are coated with anti-caking powder that makes them melt weird. Spend the extra two minutes grating your own block of asiago. Your taste buds will thank you.
❀ The overnight rise isn’t optional – sure, you can make same-day bagels, but they’ll taste like… same-day bagels. That slow, cold fermentation is what develops the complex, slightly tangy flavor that makes people ask for your recipe.
❀ Keep that water actually boiling – if it’s just simmering, your bagels will be dense and sad. You want aggressive bubbles the whole time. And yes, the malt syrup or honey really does make a difference in the final texture.
❀ Freeze smart – let them cool completely, then wrap each one individually in plastic wrap and toss them in a freezer bag. They’ll keep for months, and you can toast them straight from frozen.
Questions You’ll Probably Ask (and the Answers You Need)
➲ Can I use other cheeses instead of asiago?
Totally! Sharp cheddar works great, and so does gruyere or parmesan. Just stick with harder, aged cheeses – soft stuff like mozzarella gets greasy and weird. If you’re using something really sharp like aged cheddar, maybe back off to ¾ cup instead of the full cup.
➲ How do I store these after I make them?
For a couple days, just keep them in a paper bag on the counter – plastic makes the crust soggy. For longer storage, slice them first, then freeze in a zip-top bag. You can toast them straight from frozen, which is honestly the best way to eat leftover bagels anyway.
➲ What if my dough is too sticky or too dry?
Bagel dough should feel slightly tacky but not stick to clean hands. If it’s a gooey mess, add flour a tablespoon at a time. If it won’t come together or feels like clay, add water by the teaspoon. Humidity really affects how much flour you need, so go by feel rather than being super precise with measurements.
➲ Can I double this recipe?
Absolutely! Just use your biggest mixing bowl and be prepared for a bit more arm workout during the kneading phase. Everything else stays the same timing-wise. If you’re making 16 bagels, definitely freeze half of them unless you’re feeding a small army.
The Honest Takeaway After All That Dough-Talk
These asiago bagels are genuinely better than what you’ll get at most coffee shops and definitely better than anything from the grocery store. The process looks long when you write it all out, but most of it is just waiting around while the dough does its thing. Perfect for a lazy weekend when you want to feel accomplished without actually working that hard.
You may also like:
❀ Creamy Banana Matcha Smoothie Recipe (5-Minute Energy Boost)
❀ Easy Pineapple Smoothie Recipe (Ready in 3 Minutes!)
❀ The Best Fluffy Gluten Free Pancakes (Ready in 15 Minutes!)
❀ Easy Peach Ricotta Cake Recipe (Ready in 45 Minutes!)
Drop a comment below if you try this recipe, especially if something doesn’t go perfectly! Those “oops” stories are always the most helpful and relatable for other home cooks. And if your creation turns out amazing, don’t forget to save this recipe to Pinterest so you can easily find it next time you want a quick, delicious, and crowd-pleasing treat.
Sharing your kitchen wins and experiments helps everyone feel inspired to try something new, and having this recipe saved makes it easy to come back to again and again. Go ahead, make it, tweak it, and enjoy the results, you deserve a little kitchen bragging rights!
Cheesy Homemade Asiago Bagels Bliss
Ingredients
- 4 cups bread flour
- 1½ teaspoons instant yeast
- 2 teaspoons kosher salt
- 1 tablespoon sugar
- 1¼ cups warm water 110°F
- 2 tablespoons olive oil
- 1 cup freshly grated asiago cheese divided
- 1 large egg beaten
- 2 tablespoons coarse sea salt optional
- 2 tablespoons barley malt syrup or honey for boiling water
Instructions
- Mix dry ingredients in a bowl, add water and oil, and knead until smooth.
- Work in most of the cheese, let rise until doubled, then shape into 8 bagels.
- Chill overnight.
- Boil each bagel in sweetened water for 90 seconds per side, brush with egg, sprinkle cheese and salt, then bake at 425°F for 20–25 minutes until golden.
- Cool slightly before serving.